12/15/12

SharePoint Designer 2010 how to change the current user


When using SharePoint Designer 2010 to connect to a SharePoint and SharePoint online website, the application prompts the user to login for the first time. After the user has logged on once, the application caches this information and automatically logins to the website the next time you try to open the website. This is a desirable feature, but there is often the case when we want to login as a different user, and SharePoint Designer continues to auto login with the credentials already cached.

To be able to login as a different user, one needs to first let the application automatically login to the website. Once the website is open on the designer, there is a face icon on the bottom-left of the application as shown below:

Click to change user

If you click on the icon, the application displays a dialog indicating that you are logged on as a particular user and if you want to login as someone else. Click ok, and enter the new credentials. This should allow you to login as a different user, and you can go on with your tasks.

11/10/12

Office 365 Public Website Branding

Office 365 provides by default a public website which is usually located at an URL similar to this:


The pages folder is already set up with public permissions. This allows the site to be visited by non-authenticated users. The pages on this site are created with the root.master page. This master page can’t be modified to brand our site. The main reason is because there is a WYSIWYG editor available for these pages that allow you customize the site with predefined styles and themes. Any attempts to modify the root.master files would cause the website to break.

How do I brand my Office 365 website?

Depending on your expertise on web design and SharePoint Online (This is on what Office 365 is built on); you can brand an Office 365 with the following options:

Option 1 – Default Public website with WYSIWYG editor

Use the default public website with the default themes and styles right from the browser. This is the easiest approach, and it will deliver a basic website design with a basic layout and theme. You will be able to add a header, footer and navigation menus. We can also change the layout structure by adding different zones to the page. We can also add page title, description and keyword Meta tags to aid on SEO. Most people are really not happy with the results they get from this option.

Option 2- Public website with CSS and JavaScript.

This option allows you to use option 1 as the baseline with further customization with the use of CSS and JavaScript. Office 365 allows us to apply a custom style sheet to the website. With this style sheet, we can control many of the design elements of the website. For example, we can customize the header, footer and menu with background images and different layout effects. If we need to add other HTML elements to the web pages, we can include JavaScript with the use of a PayPal gadget (hack to avoid using the HTML gadget which uses iframes). This lets us add HTML into the page with the use of a XSL template. This option requires experience in website design and development, but it provides a lot more flexibility on the design. The main problem here is that we are still bound to using the root.master page.

Option 3 – Public Website with SharePoint Designer

When the first two options are not providing all the flexibility you need, you can now start using SharePoint Designer. This is a developer tool that allows us to open an Office 365 site and have more control over the design of the site. We can open the website pages with this editor and fully customize the HTML (within the Container tags that are required by the master page). Once we start doing customization at this level, the WYSIWYG editor on the browser will no longer work. This approach makes designer and developers happy because there is more control on the design and folder structure of the website without the need to know SharePoint specifics.

Option 4 – Create pages with a different master page and SharePoint Designer

If you are ready to move away from the root.master file, this is the approach for you. With SharePoint Designer, we can attach pages to a different master file. This master file can be customized to meet all of our design needs. For example, we can create a HTML5 master template with all the branding requirements and attach the new pages to this new master template.  This however increases the complexity level because your master page needs to meet a few requirements to be a valid SharePoint master page. At this level, SharePoint knowledge starts to become a dependency. There are however a few basic templates that can be used as a starting point.

Option 5 – Create a new sub site and make this your public website with SharePoint Designer

Office 365 allows us to create sub-sites which are created private by default. We can however change the access setting and make it public. Once we make a sub-site public, we can set any page in the sub-site as the site home page (this is a global site setting).  This tells SharePoint that when a person navigates to your domain http://mydomain.com that the browser should be redirected to the home page which now resides at the new sub-site. This is how it works for the default public website. SharePoint basically redirects users to http://mydomain.com/pages/default.aspx. For a sub-site, SharePoint redirects the users to something like: http://mydomain.com/sitepages/home.aspx.

With this approach, you now need to know more about SharePoint administration and development. The benefits are that we can now integrate SharePoint features to the public website. For example, we can display a document library, calendar, lists, custom web-parts and custom business solutions. For public users to create new records in a list, you will need to explicitly provide public write access to that list.

Main Difference between SharePoint on premises VS SharePoint online

The main difference between SharePoint on Premises and online is that you can only deployed Sandboxed solutions on the online edition.  A Sandboxed solution is isolated, and SharePoint will block it if the solution starts to become unstable. The reason behind this is because this is a Multi-tenant environment, and it is not convenient to have one tenant’s solutions affect other tenant’s sites.  This also implies that certain resources are not available for a Sandboxed solution compare to a Farm Solution which limits what you can do for your custom solutions.

Summary

SharePoint branding is not as easy as a normal HTML website, and depending on your skill set, you may choose any of the listed options above. If you are not familiar with SharePoint, you may want to partner with a company that has this expertise. I hear from many designers and a developer how frustrating is to work with this product, but like anything, certain level of expertise is required to know how to work with a particular technology.

 I hope I was able to show you a few approaches on how to brand your SharePoint public website.


11/5/12

The type was not expected. Use the XmlInclude or SoapInclude attribute to specify types that are not known statically


When trying to serialize a complex object using the XmlSerializer, we can encountered a Type was not expected exception. This exception is generated as a result of a property declared as a base type, but the actual reference is done with a child class instance. For example:

Class Declaration:

public class Account
{
int number { get; set; }
}

public class Client
{
public object[] Accounts { get; set; }
}

The client class has an array of Accounts, but the declaration of the property uses object instead of the Account class. When we try to serialize an instance of Client with the code below, the exception is generated:

Client client = new Client();
client.Accounts = new Account[]{new Account(), new Account()};

StringBuilder stringBuilder = new StringBuilder();
           
 using (XmlWriter xmlWriter = XmlWriter.Create(stringBuilder))
 {
          XmlSerializer serializer = new XmlSerializer(typeof(Client));
          serializer.Serialize(xmlWriter, objRef); 
           xmlWriter.Flush();
  }

InnerException      {"The type Account was not expected. Use the XmlInclude or SoapInclude attribute to specify types that are not known statically."} System.Exception {System.InvalidOperationException}

Solution:


The serializer expects a type of object, but it finds a type of Account instead. The easy fix would be to refactor the property and use Account instead of object. This is not as easy when we do not have access to the source code as in the case when using a third party API. When this is the case, we can tell the serializer to expect unknown types by including an array of types when instantiating the XmlSerializer which provides the following constructor:

public XmlSerializer(
                   Type type,
                   Type[] extraTypes
)

We can now change the previous code with the following:

Client client = new Client();
client.Accounts = new Account[]{new Account(), new Account()};
Type[] types = new Type[] { typeof(Account)};

StringBuilder stringBuilder = new StringBuilder();
           
  using (XmlWriter xmlWriter = XmlWriter.Create(stringBuilder))
  {
                 XmlSerializer serializer = new XmlSerializer(typeof(Client),types);
                 serializer.Serialize(xmlWriter, objRef); 
                 xmlWriter.Flush();
 }

We are now creating an array of Type[] and passing that information to the serializer in its constructor. If you run this code, you can now notice that the exception is no longer raised.  We should also notice that there may be other properties with this problem. When this is the case, we need to include all those types in the array as follows:

Type[] types = new Type[] { typeof(Account), typeof(Address)};

In this case, we added the Address type as another possible type which should be included during the serialization.

I hope I was able to help you understand why this exception is raised when serializing complex objects and show you a way to handle the problem.

11/1/12

There was no endpoint listening - WCF Certificate Policy

When using WCF with transport security, you may encounter this error:

“There was no endpoint listening at https://servername/Service1.svc that could accept the message. This is often caused by an incorrect address or SOAP action

This is often caused because we tend to use a dev or expired certificate which is actually not valid and causes an invalid certificate exception that drops the communication with the server. To address this on the dev environment, we need to add a certificate policy that can handle the invalid certificate.

This can be done by first adding a policy class:

public sealed class CertificatePolicy
{
        /// <summary>
        /// certificate policy handler
        /// </summary>
        public static void SetPolicy()
        {
System.Net.ServicePointManager.ServerCertificateValidationCallback += RemoteCertValidate;
        }

        /// <summary>
        /// remote certificate validation.
        /// </summary>
 private static bool RemoteCertValidate(object sender,       System.Security.Cryptography.X509Certificates.X509Certificate cert,
System.Security.Cryptography.X509Certificates.X509Chain chain, System.Net.Security.SslPolicyErrors error)
        {
            //ignore invalid certificates by returning true
            return true;
        }
  }

With the policy now in place, we need to add it to the client code before calling the web service as follows:

CertificatePolicy.SetPolicy();
//TODO ADD CALL TO WEB SERVICE HERE

With the SetPolicy call, we added a policy to validate the remote certificate. In the case of an invalid certificate and with no policy, this usually creates an un-handled exception which terminates the communication. With this policy, we handle the validation of the certificate and return true to ignore any invalid certificate exception. This policy should only be used on dev environment. In production, the certificates should be valid for the most part.

I hope I was able to show how to handle this exception and manage invalid certificates on your WCF service.

WCF Service Configuration Visualized

I created this diagram that attempts to help us visualize how a WCF service configuration is constructed. The diagram does not display every single attribute that can be added to a configuration, but the goal is to show the main settings and their associations.  The diagram is divided into two main layers:

Custom Assembly and WCF Service configuration

Custom Assembly:

This is the layer that contains the custom assemblies with the implementation of the service contract, security policies and custom user validators.

WCF Service Configuration:

This is the XML that resides in the app/web.config file. It contains all the elements that are needed to configure a WCF service with its endpoint, binding and behavior configuration. Each one of these elements can also contain other elements to further define the communication details, security and behaviors for the service. 

This diagram provides a simple visualization of the main elements and their association.

WCF Configuration Diagram

10/22/12

The site template requires that the feature be installed in the farm or site collection.

The site template requires that the feature be installed in the farm or site collection

This message is usually generated when we try to create a new site from a site template, but the site template was built as a Sandboxed solution and depends on a site scope feature which may not be active or does not exist. To address this issue, open the SharePoint solution on Visual Studio 2010 or 2012. We should now look into the WebTemplates folder and open the ONet.xml file.

Look at the Configurations -> Site Features settings. Look for a custom feature that may be included there, and you may need to install on the site. If this is the case, you need to install that feature first or include it in your project, so it will be activated during the activation of the site template. If your web template does not need that site feature, you can remove it from the ONet.xml file all together. You just need to make sure that the feature is not a dependency in your project.

You can now build and package the solution again. We can now go back to SharePoint to deactivate and delete the previous solution. Upload and activate the new solution. You can try to create a new site with the new site template, and the error should not be raised anymore.

10/4/12

Database First Development with ASP.NET MVC Scaffolding and Entity Framework

With ASP.NET MVC and Scaffolding, we are able to code first and create the database objects from the model. This approach basically allows us to create the model classes (implementation). We can then use Scaffolding to create the controller, view and database objects with code generation.  This however is not as straight forward when we use the Database first approach in which we design our database first and then we want to create the controller and view. We are going to walk through this scenario to see how we can achieve this with Scaffolding and the Entity Framework.

Database Model:

We first start by creating our database object model.  Create a database on SQL Server and add the following table and a few records:

CREATE TABLE [dbo].[VehicleMake](
      [MakeId] [int] IDENTITY(1,1) NOT NULL,
      [Name] [varchar](50) NOT NULL,
      [Description] [varchar](500) NULL,
 CONSTRAINT [PK_VehicleMake] PRIMARY KEY CLUSTERED
(
      [MakeId] ASC
)
) ON [PRIMARY]


--SQL SERVER 2008 SYNTAX
insert into [VehicleMake](Name,[Description])
values ('Ford','Ford Motor'),
       ('Nissan','Nissan Motor'),
        ('Toyota','Toyota USA')

This is the table that we will use for our application. We will create the entity model, controller and views without writing a line of code.

Entity Model:

Open Visual Studio 2010 and create an MVC project with these options:
  • ASP.NET MVC 4 Web Application
  • Template: Internet Application
  • View Engine: Razor

Now that we have our project created, we need to add the database entity model first. This is basically the concept of Database first development. Add the entity model from the database by following these steps:
  • Right click the Models folder and select Add New Item
  • On the right, select Data and click on ADO.NET Entity Data Model.  Enter VehicleModel in the name field
  • Select Generate from database
  • Select the database connection string or create a new connection to make sure you can connect to your database and select your database name
  • Select the table that we created before and click finish

Convert Entity from ObjectContext to DbContext:

This has created the Entity model, and we should be able to see the object diagram with the one class.  If we inspect the designer class under the edmx file (solution explorer), we can see that the Entities class inherits from ObjectContext. This causes a problem for Scaffolding because it needs a context object of type DbContext.   We will make this change with the following steps:
  • Right click on the edmx class diagram and select Add Code Generation
  • Click on Code and select EF DbContext Generator. If you do not see this option, click on Online Templates and install the template by selecting Entity 4 or 5  DbContext Generator. This is determined by the version of the Entity framework you have installed.

We just replaced the code in the edmx designer class with code generated in tt files. You should have two files one with ModelContext.tt and Model.tt.  The TT extension stands for Text Template. This is the T4 technology that allows us to generate code using templatesa, and this is not just for MVC projects.  The model context file contains the database context class of type DbContext.  The model tt file contains the entity model for the table.

public partial class CommerceEntities : DbContext
    {
        public CommerceEntities()
            : base("name=CommerceEntities")
        {
        }
   
        protected override void OnModelCreating(DbModelBuilder modelBuilder)
        {
            throw new UnintentionalCodeFirstException();
        }
   
        public DbSet<VehicleMake> VehicleMakes { get; set; }
    }

public partial class VehicleMake
    {
        public int MakeId { get; set; }
        public string Name { get; set; }
        public string Description { get; set; }
    }

Scaffolding Controller and View:

We are now ready to start creating our controller and view. Let’s start by installing the Scaffolding package to our project by following these steps:
  • On Visual Studio, select tools->Library Package Manager->Package Manager Console
  • At the PM> prompt, type this command:  INSTALL-PACKAGE MVCSCAFFOLDING

That should install the T4 templates for code generation and the MVCScaffolding reference to our project.  Let’s now create our vehicle make controller and view by typing this command at the PM> prompt:
  • Scaffold Controller VehicleMake  -force -repository -DbContextType "CommerceEntities"

In this command, we are telling our code generation to create a controller and view based on the VehicleMake model. The –force switch is used to overwrite any previous files. The –repository switch is to create a repository interface that would be used by the controller. This facilitates for a dependency injection approach which avoids having a tightly couple implementation of the entity object in the controller. The –DbContextType is to tell our code generation that when the repository class is created it should use the DbContextType that was created when we converted the entity classes to type DbContext. In our case, it is the CommerceEntities. If this parameter is not used, the code will be generated with a type of MVCContext which is not our entity context.

The output for this command should look like this:

PM> scaffold controller VehicleMake -force -repository -DbContextType "CommerceEntities"
Scaffolding VehicleMakesController...
CommerceEntities already has a member called 'VehicleMakes'. Skipping...
Added repository 'Models\VehicleMakeRepository.cs'
Added controller Controllers\VehicleMakesController.cs
Added Create view at 'Views\VehicleMakes\Create.cshtml'
Added Edit view at 'Views\VehicleMakes\Edit.cshtml'
Added Delete view at 'Views\VehicleMakes\Delete.cshtml'
Added Details view at 'Views\VehicleMakes\Details.cshtml'
Added Index view at 'Views\VehicleMakes\Index.cshtml'
Added _CreateOrEdit view at 'Views\VehicleMakes\_CreateOrEdit.cshtml'

*Note: If you get this error:

Get-PrimaryKey : Cannot find primary key property for type 'demo.Models.VehicleMake'. No properties appear
 to be primary keys

Check your model class and make sure the primary key field is annotated accordingly by adding the [Key] attribute and the System.ComponentModel.DataAnnotation namespace. The model class should look like this:
using System.ComponentModel.DataAnnotations;
   
    public partial class VehicleMake
    {
        [Key]
        public int MakeId { get; set; }
        public string Name { get; set; }
        public string Description { get; set; }
    }

In our code, we should now have all the files listed in the output of the package manager console.  The repository file should have this code: (notice the context object is of type CommerceEntities)

public class VehicleMakeRepository : IVehicleMakeRepository
    {
        CommerceEntities context = new CommerceEntities();

        public IQueryable<VehicleMake> All
        {
            get { return context.VehicleMakes; }
        }

The controller file should look as follows: 

public class VehicleMakesController : Controller
    {
       private readonly IVehicleMakeRepository vehiclemakeRepository;

       // If you are using Dependency Injection, you can delete the following constructor
        public VehicleMakesController() : this(new VehicleMakeRepository())
        {
        }

        public VehicleMakesController(IVehicleMakeRepository vehiclemakeRepository)
        {
                    this.vehiclemakeRepository = vehiclemakeRepository;
        }

You should notice how the controller uses the repository interface as the parameter in the constructor. This allows us to use dependency injection and separate the model operations from the controller. The controller uses the repository for all the data/model tasks.

For the views, we have the index, edit, create, delete and details views which can be used for the CRUD operations. These views and controller can be enhanced to meet your application requirements.

Run the project:

We can now compile the project and run it. The application should load in the browser and display the home page. We can type the controller name on the url to something like: (add the port number when using Visual Studio)


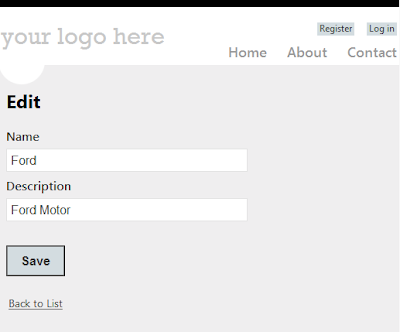
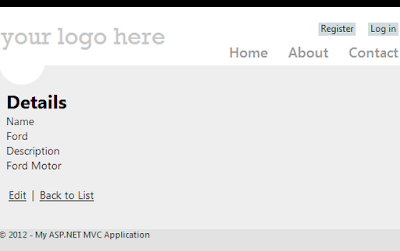
This should load the following views:
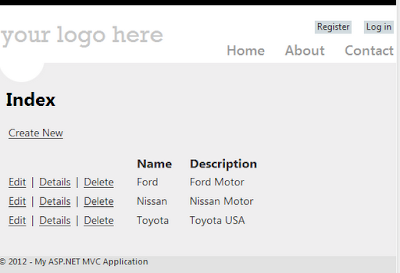
Index View

Edit View

Details View

These views may not have a great design, but the objective here was to show how we can create a running application with no implementation effort at the application level.  We can see the records that were added during our database creation step. From these views, we should be able to add, edit and delete records, and the changes will be reflected in our table.

I hope I was able to show you how to leverage Scaffolding and the Entity framework to accelerate your development process. We started with a database model, use some code generation templates and created a simple application in a short time. 

10/3/12

Unable to load the specified metadata resource

Exception Description:


Exception Details: System.Data.MetadataException: Unable to load the specified metadata resource.

Resolution:


This error is often generated when we are using the Entity Framework for database access. The error means that there is a problem with finding the metadata information to allow the Entity Framework to work properly and translate queries against the conceptual model. At design time, the database entity model is created in the .edmx file. After compilation, the metadata information is stored as a resource in three different files:
  • .csdl  Conceptual Schema Definition Language
  • .ssdl  Store Schema Definition Language
  • .msl Mapping Specification Language
By default, these files get generated and embedded as a resource on the assembly. To find the location of these files, the Entity Framework uses the entities connection string in the config file. If you take a look at a config file, we will find this setting:

<connectionStrings>
    <add name="GalleryEntities" connectionString="metadata=res://*/Gallery.csdl|
res://*/Gallery.ssdl|
res://*/Gallery.msl;
provider=System.Data.SqlClient;provider connection string=&quot;data source=localhost\sqlexpress;initial catalog=…;App=EntityFramework&quot;" providerName="System.Data.EntityClient" />
  </connectionStrings>

For this project, we can see that the connection string indicates that all the files should be found on the default assembly’s (*) resources, and their names match the Gallery.* pattern. We are getting an error, so there is something not matching here. We will need to compile the code and inspect the assembly using reflector or ilspy.  These applications let us decompile assemblies, so we can browse their content. After opening the assembly, look at the resources folder, we should see the files there. In my case, there was a problem with the way the files get generated. The actual name of the files is Models.Gallery.*.  If you correct those entries in the config file, the connection string should now read as follows:

<connectionStrings>
    <add name="GalleryEntities" connectionString="metadata=res://*/Models.Gallery.csdl|
res://*/Models.Gallery.ssdl|
res://*/Gallery.msl;
provider=System.Data.SqlClient;provider connection string=&quot;data source=localhost\sqlexpress;initial catalog=…;App=EntityFramework&quot;" providerName="System.Data.EntityClient" />
  </connectionStrings>

We can now run the application, and the data should load with no problems.  If this was not the problem for your project, you should also make sure in which assembly the resource files are located. If it is not in the default assembly, you should replace the * in the connection string with the name of the correct assembly. For example:

connectionString="metadata=res://myassembly.dll/Models.Gallery.csdl|
res://myassembly.dll /Models.Gallery.ssdl|
res://myassembly.dll /Gallery.msl;

That indicates that those files are embedded as a resource in a different dll. I hope this provides some help in resolving this metadata exception.


9/20/12

MVC WebGrid Helper


If you are using Razor views and need to build a grid to show data, you can leverage the WebGrid  HTML helper. This helper can let us build a grid with several features like custom styles, sorting, paging and AJAX reload.   

This helper is found in the System.Web.Helpers.dll which should be configured automatically when using WebMatrix. If you are using Visual Studio 2010 MVC 3 projects with Razor views, you may need to install a NuGet package by entering this command in the Package Manager Console (Tools->Library Package Manager)

Install-Package RazorGenerator.Templating

That command should add the reference automatically.

The Model:

For the purpose of this article, we will be using a simple model with a few properties. 

public class Item
{     
    public int Id{get;set;}
    public string Name{get;set;}
    public string Description{get;set;}
}

We will create a list of items that we can show on the grid:

List<Models.Item> items = new List<Models.Item>();
items.Add(new Models.Item{Id=1,Name="Prod1",Description="one"});
items.Add(new Models.Item{Id=2,Name="Prod2",Description="two"});
items.Add(new Models.Item{Id=3,Name="Prod3",Description="three"});
items.Add(new Models.Item{Id=4,Name="Prod4",Description="four"});
 
Now that we have the model ready with a few records, we can work on showing the data on the grid.

Basic Grid:

To build a basic grid, we just need to instantiate the grid and pass the model in the constructor:

WebGrid grid = new WebGrid(items);

On the view, we just need to add this mark-up:

@grid.GetHtml()

We can now run the application and load the view. The grid on its simplest form looks like this:


This is just a basic HTML table with not much style, but the WebGrid helper provides several other features that can allow us to customize the way it renders. For example, if you need to control the number of pages, you can change the instantiation to look like this:

WebGrid grid = new WebGrid(items, rowsPerPage:2);

The view now renders a paging control on the footer of the grid, and it shows two records per page.


We should now control the way the columns are displayed. This can be done by adding columns to the grid to specify the columns order, the field to bind and the header label.


@grid.GetHtml(
       columns:grid.Columns(
             grid.Column("Id", "Item Id"),
             grid.Column("Name", "Name"),
             grid.Column("Description", "Description")
       )
      )

After making this change, we can now refresh the page, and the grid should look this way:


Grid and Styles:

We should now try to improve the design with some CSS changes. The WebGrid helper allows us to add a class names to style the table, header, footer, row and alternating row elements. We first add these CSS styles:

.gridTable {margin: 5px;padding: 10px;border: 1px #c8c8c8 solid;border-collapse: collapse;min-width: 550px; background-color: #fff;color: #fff;}
.gridHead th{font-weight: bold;background-color: #030D8D;color: #fff;padding: 10px}
.gridHead a:link,.gridHead a:visited,.gridHead a:active,.gridHead a:hover {color: #fff;}
.gridHead a:hover {text-decoration:underline;}
.gridTable tr.gridAltRow{background-color: #efeeef;}
.gridTable tr:hover{background-color: #f6f70a;}
.gridAltRow td{padding: 10px;margin: 5px; color: #333;}
.gridRow td{padding: 10px;color: #333;}
.gridFooter td{padding: 10px; background-color: #c7d1d6;color: #999;font-size: 12pt;text-align: center;}
.gridFooter a{font-weight: bold;color: #333; border: 1px #333 solid;}

We can now apply the styles to the grid by associating the grid elements to our CSS class names as listed below:

@grid.GetHtml(
       tableStyle: "gridTable",
       headerStyle: "gridHead",
       footerStyle:"gridFooter",
       rowStyle:"gridRow",
       alternatingRowStyle: "gridAltRow",
       columns:grid.Columns(
             grid.Column("Id", "Item Id"),
             grid.Column("Name", "Name"),
             grid.Column("Description", "Description")
       )
      )

We refresh the page, and our grid now looks like this:


That is much better. You can also notice that the paging control has been improved with better fonts and button style. We added a hover style to the rows as well. This allows us to highlight the rows as the cursor moves over them.


The grid by default provides sorting capability. If we click on the headers, we can see how the data is sorted. We added a style to the header labels to underline the selected header when the cursor hovers over the label.

AJAX Reload:

One more thing to notice is that when we sort or click to another page, the whole page refreshes.  We can prevent a page reload by using AJAX.  To achieve this, we first need to wrap the grid markup with a DIV element as follows:

<div id="gridContent">
  
    @grid.GetHtml(
       tableStyle: "gridTable",
       headerStyle: "gridHead",
       footerStyle:"gridFooter",
       rowStyle:"gridRow",
       alternatingRowStyle: "gridAltRow",
       columns:grid.Columns(
             grid.Column("Id", "Item Id"),
             grid.Column("Name", "Name"),
             grid.Column("Description", "Description")
       )
      )
 </div>

When we instantiate the grid, we need to set the AJAX parameter ajaxUpdateContainerId with the id of our div:

WebGrid grid = new WebGrid(items, rowsPerPage:2, ajaxUpdateContainerId: "gridContent");

Refresh the page, we can now try to sort or click to another page, and we can notice that there is no page post back as only the grid reloads. There are additional features that we did not cover on this post, but I hope I was able to provide a bit more insight on how to use the WebGrid helper.