12/5/20

Building App Chatbots Power Virtual Agents

Power Virtual Agents Chatbots Overview (6 of 6)


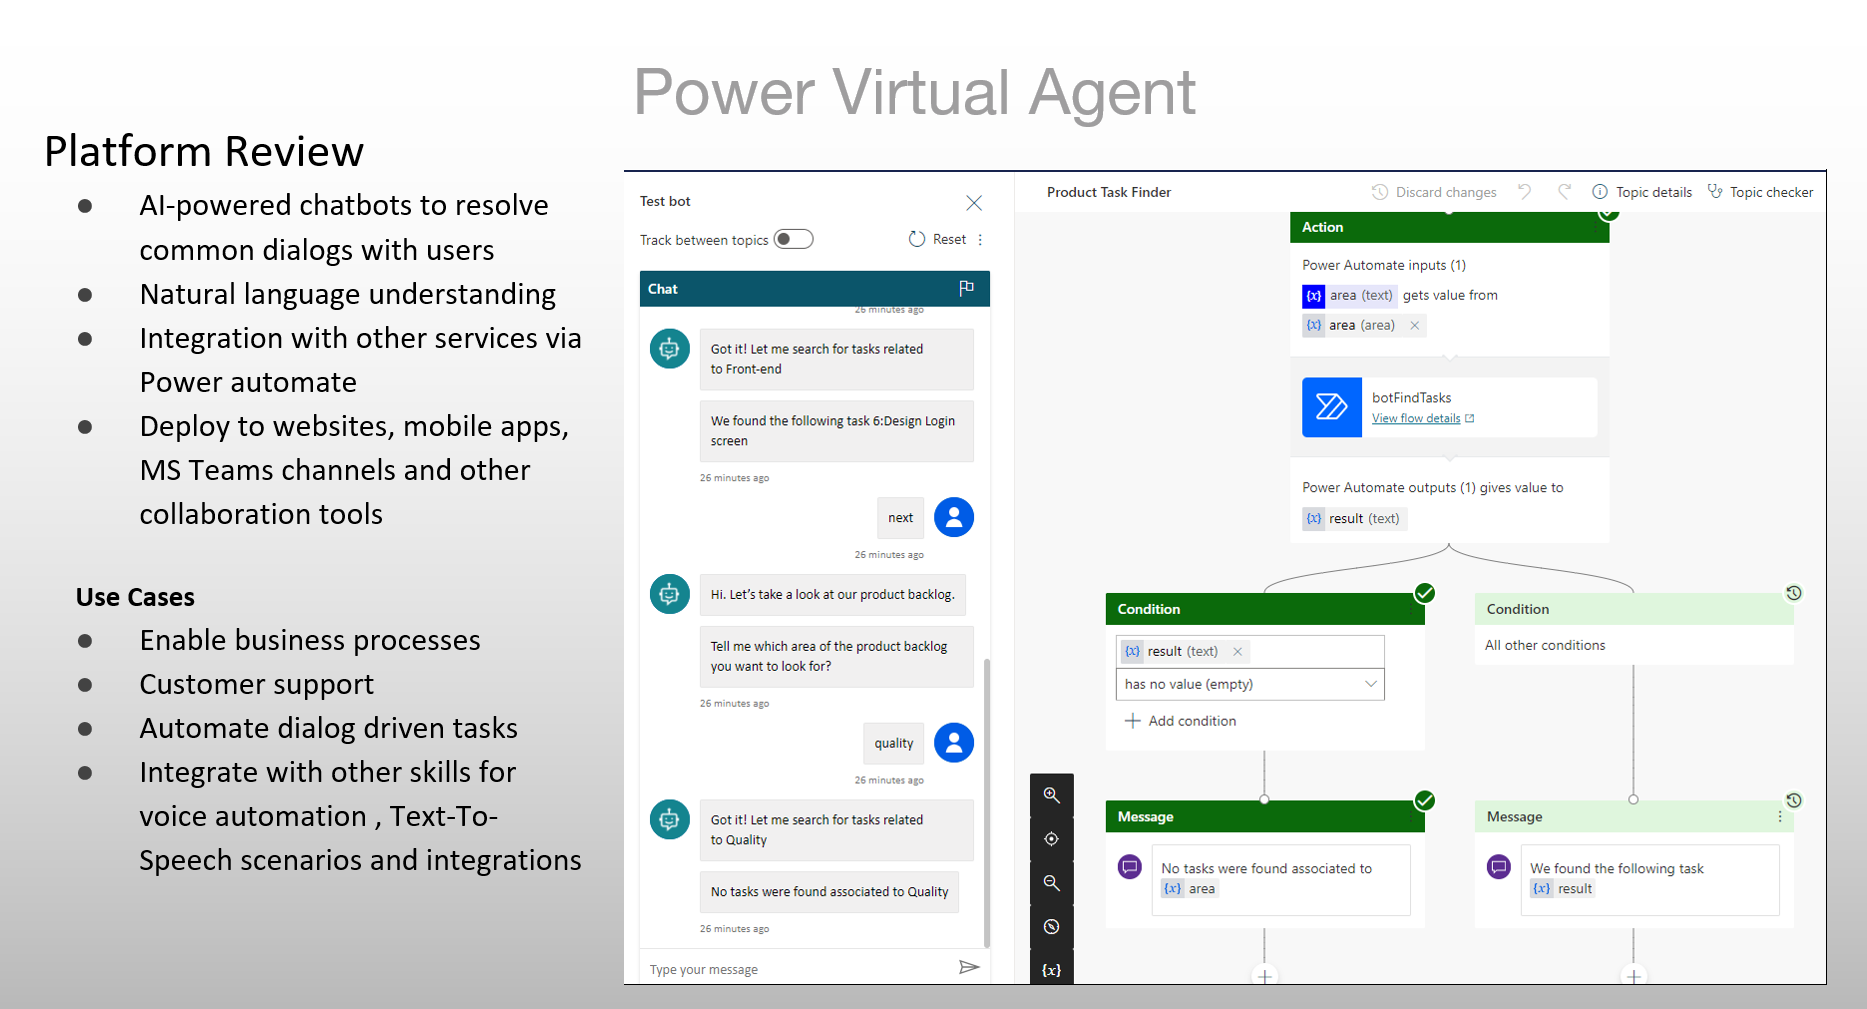
In this video, we discuss the use cases to build chatbots. We show how to build topics, entities to build a chatbot flow that can enable users to search information from the SharePoint data list. We use Power Automate to integrate an OData API call from the Chatbot to SharePoints, so we can filter on items based on a selected filter.


Welcome to the building apps with Microsoft 365 series. This is a series of six videos. In each video, we discuss a technology area on the Microsoft 365 platform. If you follow this series, you will be able to build an application which can run from your mobile device by downloading the PowerApps mobile app from the app store.


Chatbots by Oscar Garcia @ozkary


Platform Review

  • AI-powered chatbots to resolve common dialogs with users
  • Natural language understanding
  • Integration with other services via Power automate
  • Deploy to websites, mobile apps, MS Teams channels and other collaboration tools

Use Cases

  • Enable business processes
  • Customer support
  • Automate dialog driven tasks
  • Integrate with other skills for voice automation , Text-To-Speech scenarios and integrations


Originally published by ozkary.com

12/3/20

Building Apps Power Apps Overview

PowerApps on Microsoft 365 Overview (5 of 6)


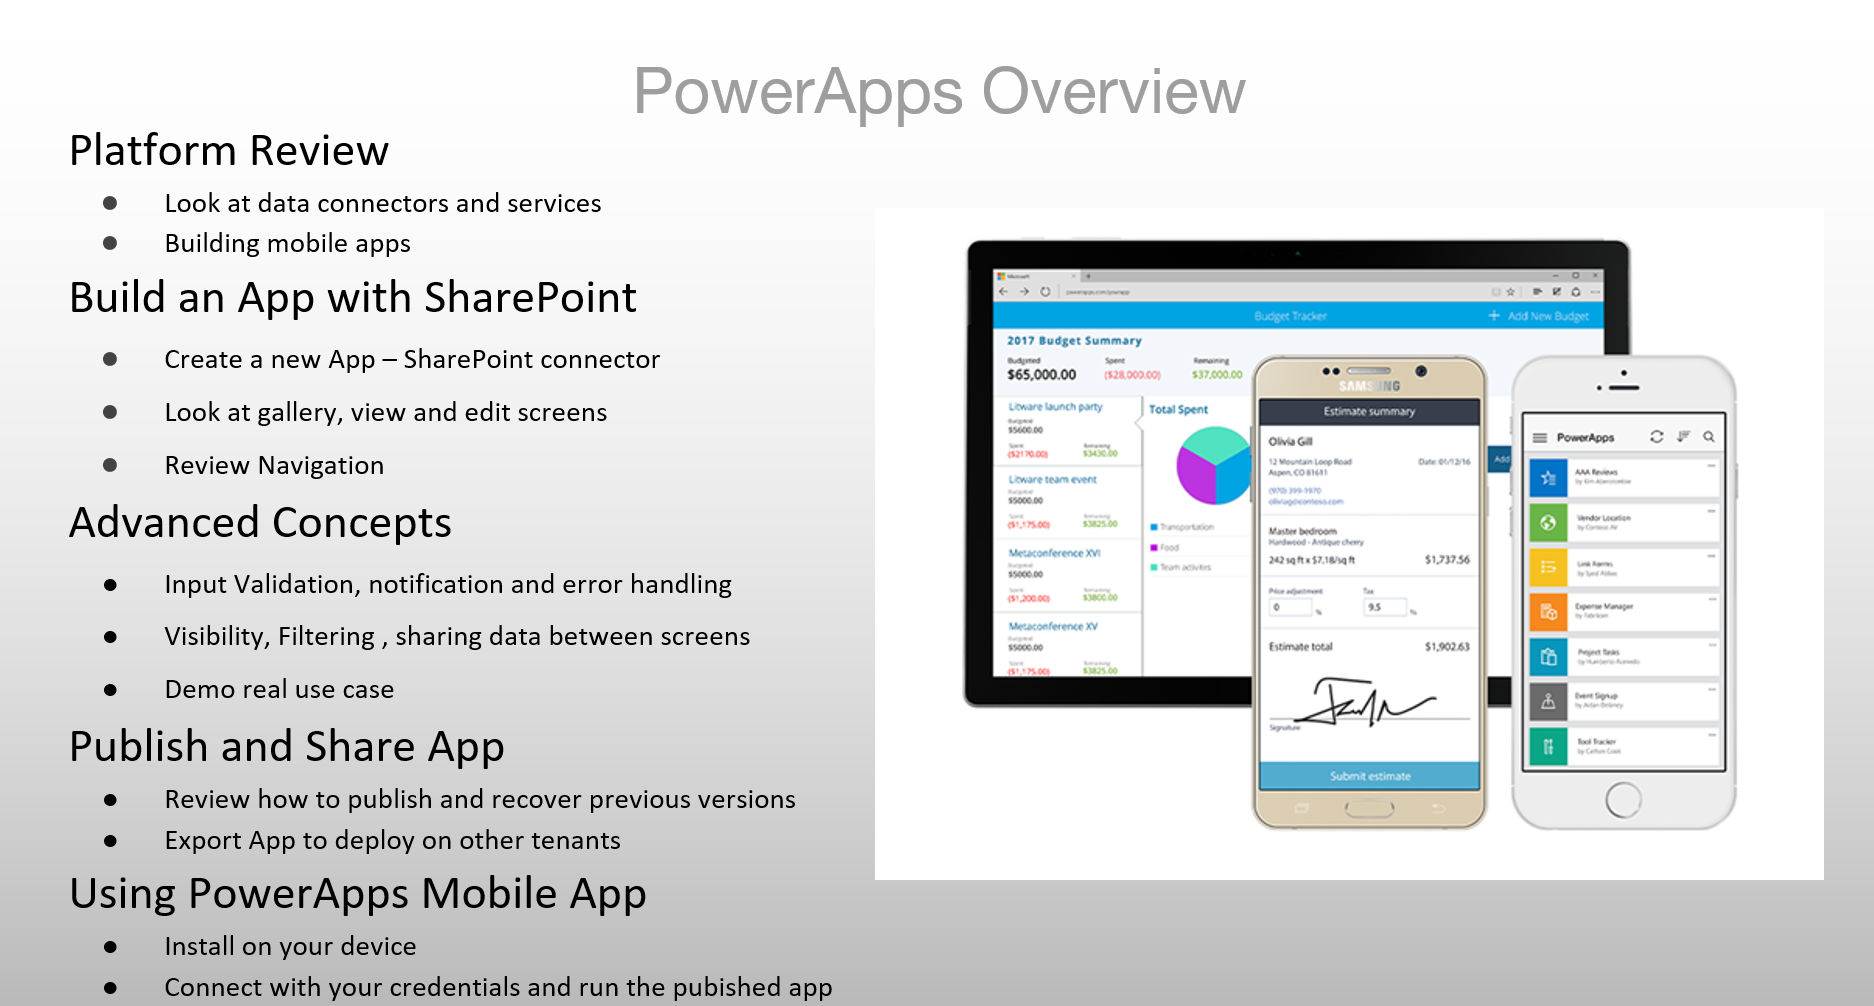
In this video, we build a mobile application with PowerApps. We integrate the app with a SharePoint data list and PowerBI online dashboard all in real-time. We start by creating an app from the SharePoint data list. After looking at the boiler-plate app features, screens and navigation, we make changes to support application level variables, toast notifications, flyout menus. We also add a new screen to embed a PowerBI dashboard.


Welcome to the building apps with Microsoft 365 series. This is a series of six videos. In each video, we discuss a technology area on the Microsoft 365 platform. If you follow this series, you will be able to build an application which can run from your mobile device by downloading the PowerApps mobile app from the app store.


PowerApps by Oscar Garcia @ozkary


Platform Review

  • Look at data connectors and services
  • Building mobile apps

Build an App with SharePoint

  • Create a new App – SharePoint connector
  • Look at gallery, view and edit screens
  • Review Navigation

Advanced Concepts

  • Input Validation, notification and error handling
  • Visibility, Filtering, sharing data between screens
  • Demo real use case

Publish and Share App

  • Review how to publish and recover previous versions
  • Export App to deploy on other tenants

Using PowerApps Mobile App

  • Install on your device
  • Connect with your credentials and run the published app


Originally published by ozkary.com

12/1/20

Building Apps PowerBI Overview

Power Platform on Microsoft 365 Overview (4 of 6)


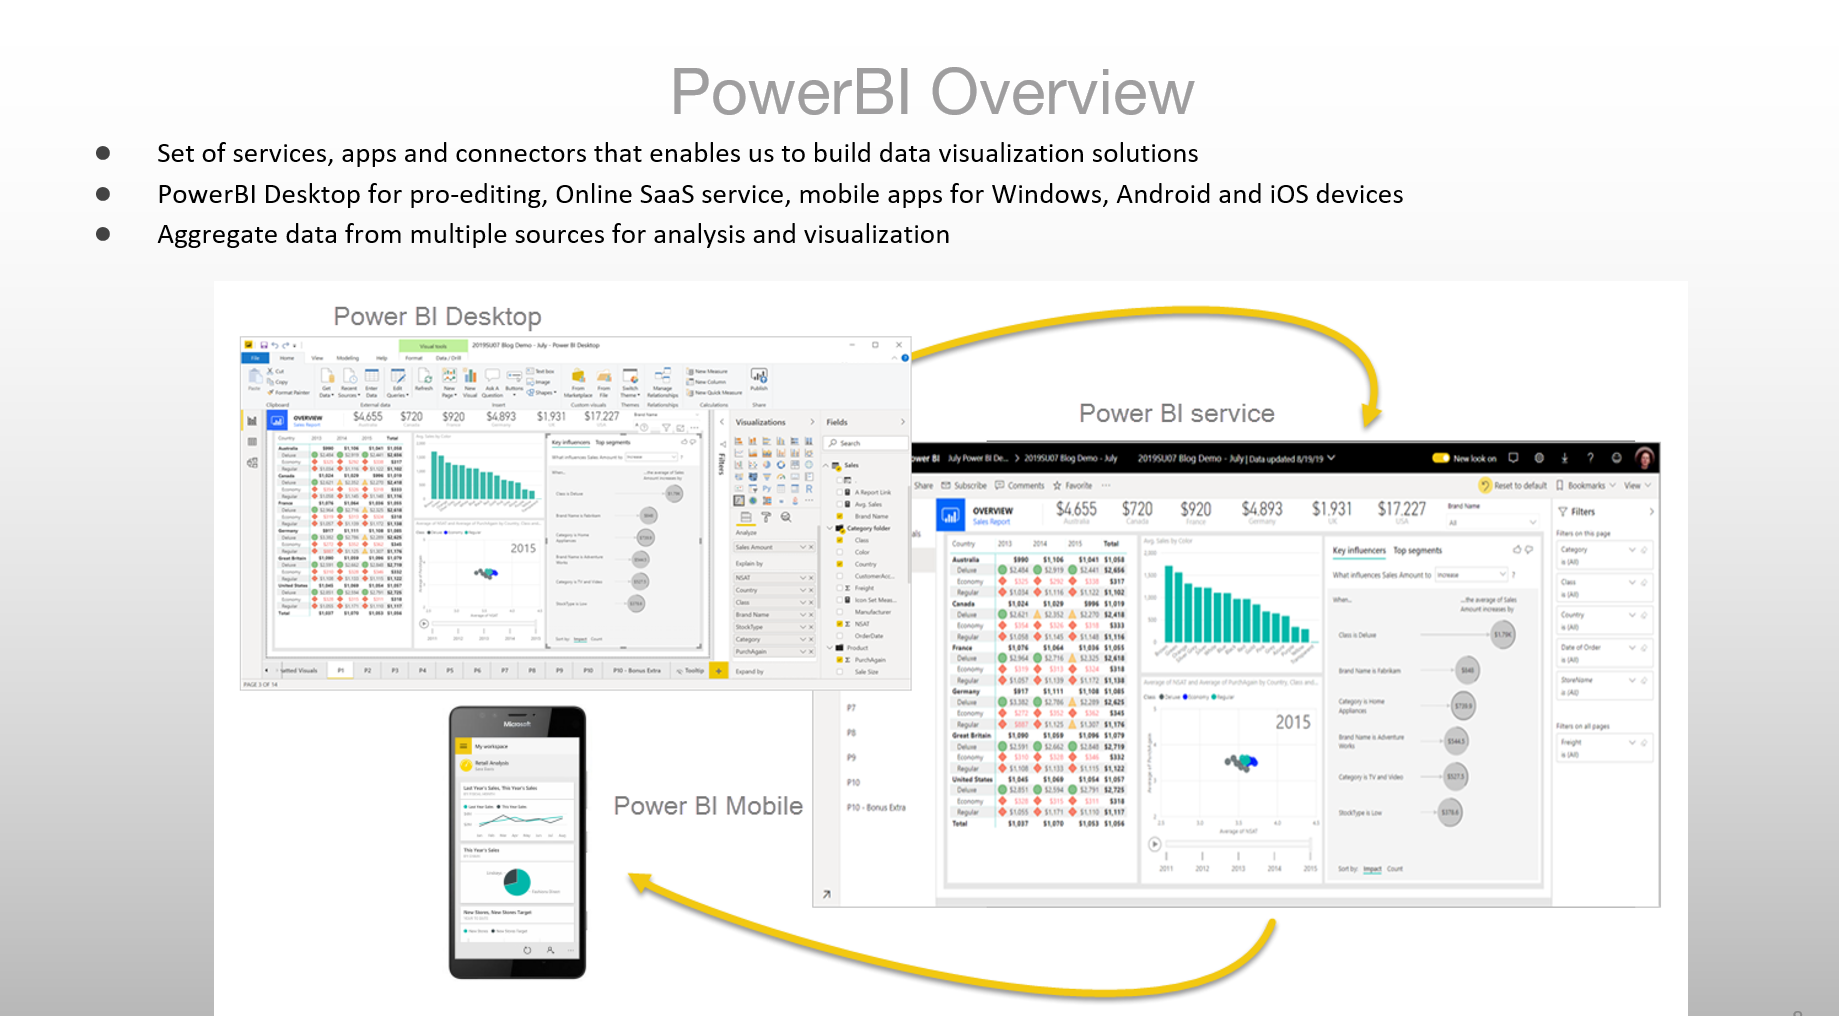
In this video, we provide an overview of the Microsoft 365 PowerBI Desktop and Online service. We talk about the different areas of this platform. For example, the desktop application which is free to use provides the ability to design the reports. This also enables us to also publish reports to the Online services, so we can build dashboards. 

To show the capabilities, we build a report in real-time by connecting to a SharePoint data list. This is done to enable us to build visualization reports to see what our data really means. After we publish a report, we embed the report in our PowerApps app.


Welcome to the building apps with Microsoft 365 series. This is a series of six videos. In each video, we discuss a technology area on the Microsoft 365 platform. If you follow this series, you will be able to build an application which can run from your mobile device by downloading the PowerApps mobile app from the app store.


PowerBI Desktop and online by Oscar Garcia @ozkary

Microsoft PowerBI

  • Set of services, apps and connectors that enables us to build data visualization solutions
  • PowerBI Desktop for pro-editing
  • Online SaaS service to publish and share dashboards
  • Mobile apps for Windows, Android and iOS devices
  • Aggregate data from multiple sources for analysis and visualization
  • Embed dashboards on PowerApps solutions


Originally published by ozkary.com

11/15/20

Building Apps Power Platform Overview

Power Platform on Microsoft 365 Overview (3 of 6)


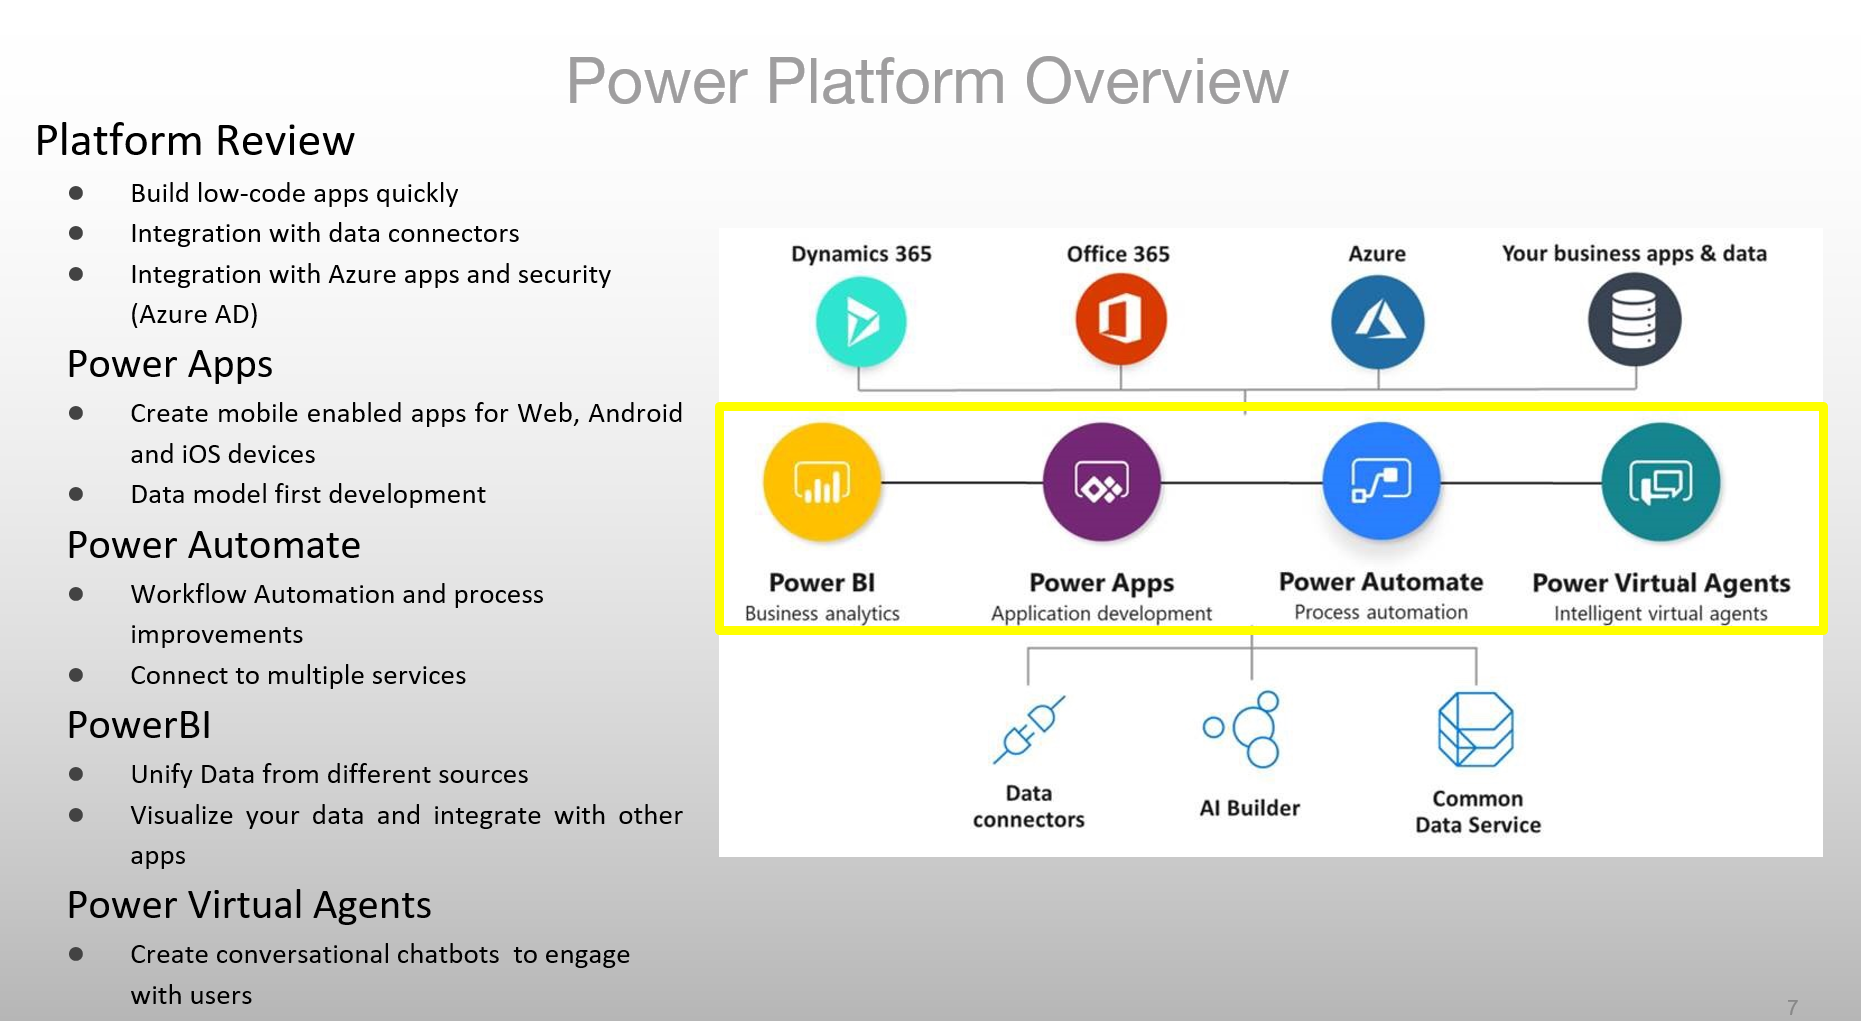
In this video, we provide an overview of the Microsoft 365 Power Platform. We introduce the major services that are available, and we talk about how to leverage them when building an application.  As an example, we take a SharePoint Web form and enhance it with a PowerApps Web form. We also integrate the SharePoint app with Power Automate by pushing new records to Microsoft Team to show team collaboration capabilities.


Welcome to the building apps with Microsoft 365 series. This is a series of six videos. In each video, we discuss a technology area on the Microsoft 365 platform. If you follow this series, you will be able to build an application which can run from your mobile device by downloading the PowerApps mobile app from the app store.


Power Platform by Oscar Garcia @ozkary

Platform Review

  • Build low-code apps quickly
  • Integration with data connectors
  • Integration with Azure apps and security (Azure AD)

PowerApps

  • Create mobile enabled apps for Web, Android and iOS devices
  • Data model first development

Power Automate

  • Workflow Automation
  • Process improvements
  • Connect to multiple services

PowerBI

  • Unify Data from different sources
  • Visualize your data and integrate with other apps
  • Online dashboards with PowerBI online

Power Virtual Agents

  • Create conversational chatbots  to engage with users
  • Enable the search of information

Originally published by ozkary.com

11/12/20

Building Apps SharePoint Overview

SharePoint Microsoft 365 Overview (2 of 6)


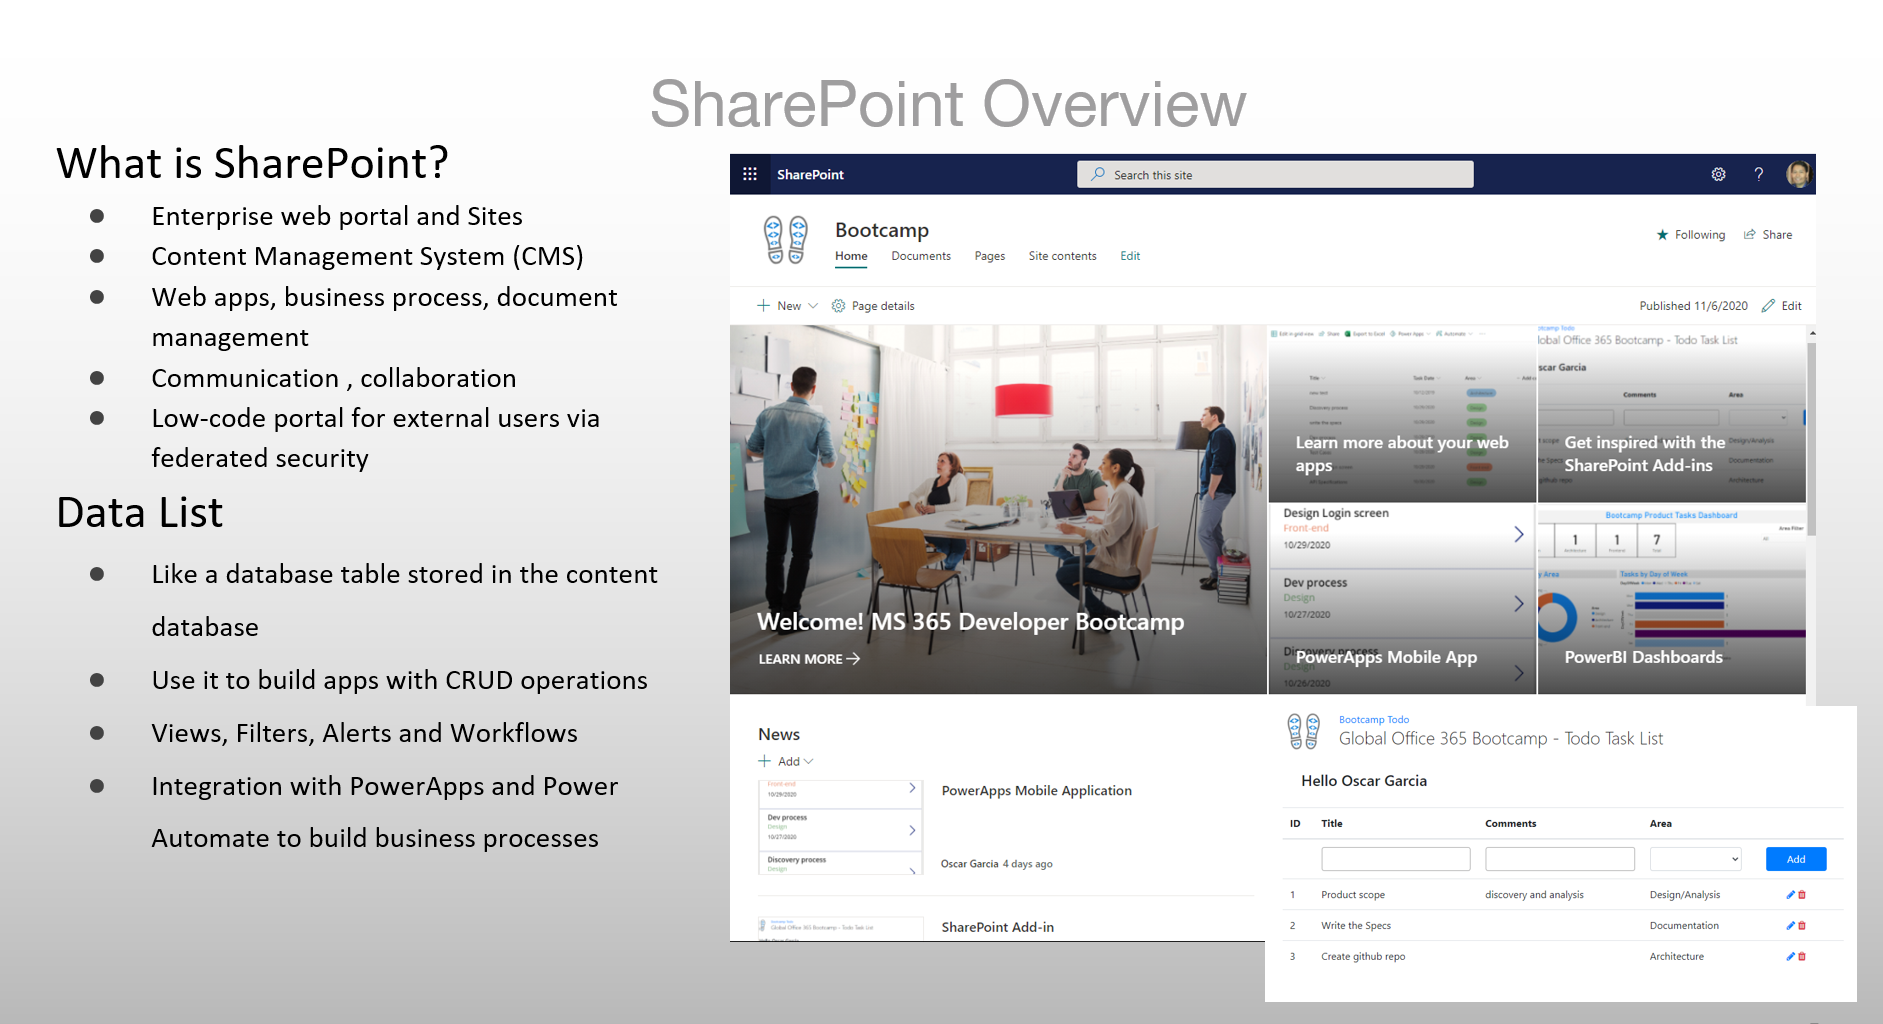
In this video, we provide an overview of SharePoint Web Portal features, content and document management systems. Since we are building an application, we focus on building a data list which functions as a database table to store our app data. We take a model-first approach to define the model meta-data and constraints. We then build the application front-end.


Welcome to the building apps with Microsoft 365 series. This is a series of six videos. In each video, we discuss a technology area on the Microsoft 365 platform. If you follow this series, you will be able to build an application which can run from your mobile device by downloading the PowerApps mobile app from the app store.


SharePoint Platform by Oscar Garcia @ozkary

What is SharePoint?

  • Enterprise web portal and Sites
  • Content Management System (CMS)
  • Web apps, business process, document management
  • Communication, collaboration 
  • Low-code portal for external users via federated security

Data List

The video covers the following implementation details in real-time.

  • Like a database table stored in the content database
  • Use it to build apps with CRUD operations
  • Views, Filters, Alerts and Workflows
  • Integration with PowerApps and Power Automate to build business processes


Originally published by ozkary.com

11/11/20

Building Apps Microsoft 365 Overview

Microsoft 365 Overview (1 of 6)


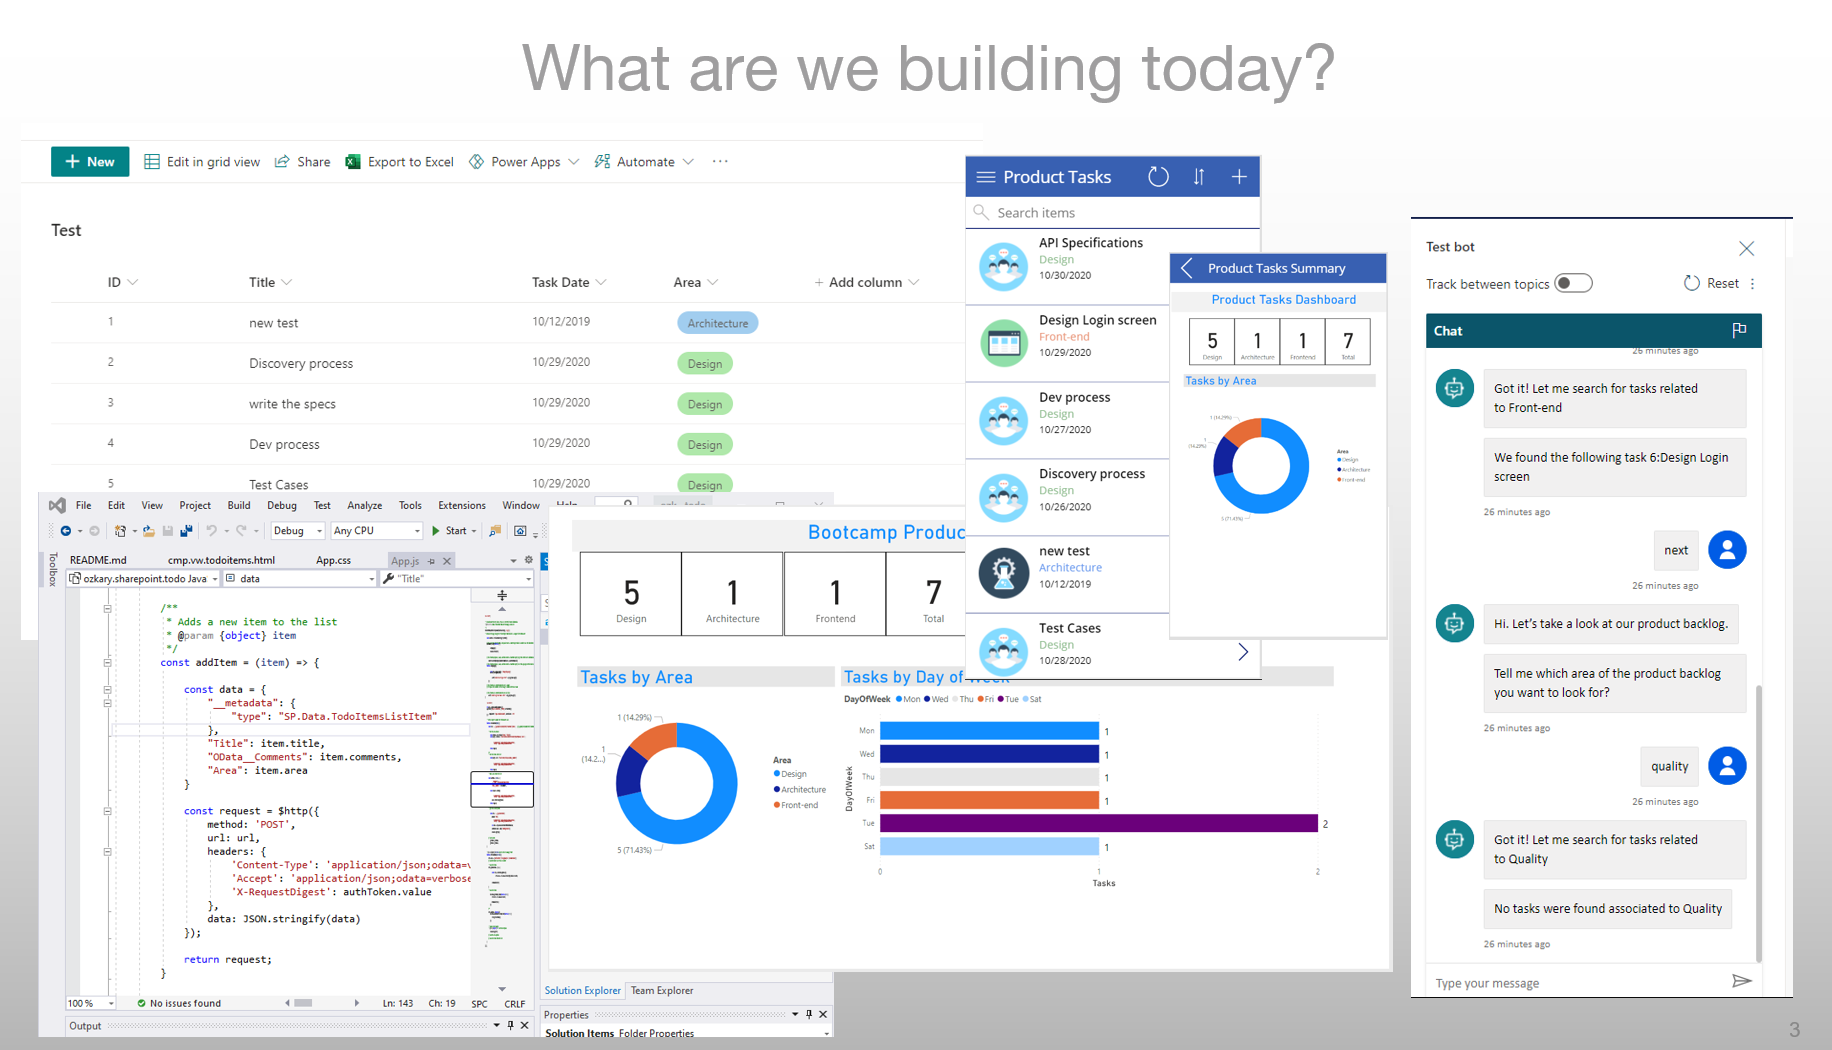
In this video, we provide an overview of the Microsoft 365 platform. We explain some platform services, so developers may find a use case applicable for their needs. In order to make this practical, we build an actual application in real-time. We do this to show the capabilities of the platform. 


Welcome to the building apps with Microsoft 365 series. This is a series of six videos. In each video, we discuss a technology area on the Microsoft 365 platform. If you follow this series, you will be able to build an application which can run from your mobile device by downloading the PowerApps mobile app from the app store.


Microsoft 365 Platform by Oscar Garcia @ozkary


Product Management App

  We build this app by looking at the following areas:

  • Data and Web application with SharePoint and PowerApps
  • Process Automation and collaboration with Power Automate and MS Teams
  • Mobile app with PowerApps
  • Data visualization with PowerBI
  • Chatbot Search Automation with Virtual Power Agents


Originally published by ozkary.com

11/9/20

Microsoft 365 Power Platform Overview


This is a presentation for the Microsoft 365 Developer Bootcamp.

powerapp solution


In this bootcamp, we build an app by using the following technologies:
  • SharePoint Data List
  • PowerApps Web Forms
  • Power Automate flows with MS Teams
  • PowerBI desktop and online dashboards
  • PowerApps mobile app with PowerBI dashboard
  • Power Virtual Agent(chatbot) with Power Automate flow and SharePoint data list OData  calls
Github Repo:  https://github.com/ozkary/sp-addin-todo

Chatbots

ozkary chatbot


Originally published by ozkary.com

10/10/20

SOAP API to REST with Azure API Management and Visual Studio Code

A SOAP WSDL (Web Service Description Language) is an XML-based interface description language that is widely used by older APIs. With the modernization of Web standards, most APIs today use REST (Representational state transfer) and JSON (JavaScript Object Notation).  In some cases, there may be a need to convert a SOAP API to REST without having to refactor the API. Luckily for us, Web development tools and Azure can help us get this done.

Azure API Management Service

With the evolution of Web tooling and Cloud computing, we can continue to use SOAP APIs by importing a WSDL definition and creating an OpenAPI (JSON) definition using Visual Studio Code (VS Code) and Azure API Management service. Let us see how we can quickly do this.

We first need to open VS Code and have an Azure subscription. We can get a free Azure subscription by visiting azure.com. Once VS Code is running, we need to install the Azure API management extension from the extension’s menu.  This extension enables us to connect to Azure and provision new API services.

From the Azure API Management extension menu (Azure Icon – Left Bar), select the target subscription. Resources need to be created under a subscription. Right click and select Create “API management in Azure”.  This action opens an edit box on VS Code command palette (top-center) which prompts for the API name.  We should try to use something that is unique to your brand or company to avoid name collisions from other users. 

After the API management service is provisioned, the VS Code extension should display the recently created service. At this point, we can add a new API from a WSDL document. To do that and due to limitations on this extension, we need to open the API service from the Portal.  We can do this by doing a right click on the API service name and selecting “Open in Portal”.

Once the Azure Portal loads on the browser, we can click on the “Add API” menu option. This action loads a view which shows all the supported standards.


API Standards

For our case, we should select WSDL. At this point, we need to have either a link or the actual WSDL file.  We also need to have the single WSDL file that contains all the web operations.  We can easily get that file by loading the SOAP API endpoint with the URL parameter singleWsdl as shown below:


https://api.ozkary.com/endpoint.svc?singleWsdl


Note: Replace the URL with the target endpoint

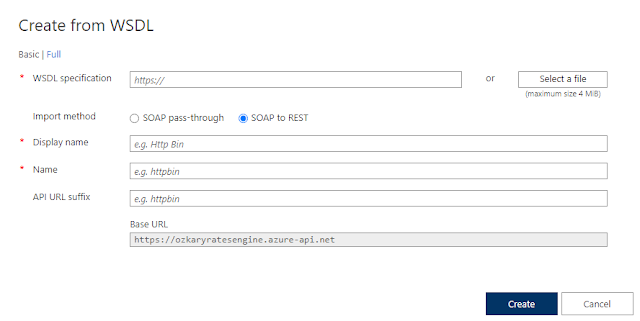
When we have either a link or the actual file, we can import it into the Azure API Management console.  For the import process, select the “SOAP to REST” option. This option enables us to convert the XML metadata into a REST metadata which is used to build the Web operations with JSON.  We should also use the API URL suffix to separate different areas of the APIs. This appends the suffix to the endpoint-based URL.

Import WSDL to REST


Recursive Error


Error: Parsing error : Unable to import API from WSDL: Element named 'http://schemas.ozkary.com/sample.xsd:Product' has a recursive definition. Recursive types are not supported.


If there is a recursive error, the import will not be able to complete the process. The error indicates that in one of the SOAP complex types, there is a property that has itself as type definition, and this causes the engine to do a recursive look up. This leads to infinite lookups which will never end thus causing the error.  The only way to fix this error is to change the complex type definition by removing the recursive type reference.

To illustrate this problem, let us look at an example. In the following Product complex type, we can see that there is a Product property which uses the same type (Product). This causes a recursive error as it endlessly looks at the type definition.


<xs:complexType name="Product">

    <xs:sequence>

        <xs:element minOccurs="0" maxOccurs="1" name="Name" type="xs:string"/>

        <xs:element minOccurs="0" maxOccurs="1" name="SKU" type="xs:string"/>

        <xs:element minOccurs="0" maxOccurs="1" name="Product" type="tns:Product"/>        

    </xs:sequence>

</xs:complexType>


Testing the API

Once the WSDL is processed successfully, we can now look at the operations from the portal and even test them using the REST format.  This would be like how we can test using Postman or Swagger UI.  Note that there are two ways of testing the API. We can either use the Azure Portal or go back to VS Code and test the operations from the IDE. Independently of the selected method, the goal is to validate that the REST endpoint work.

Exporting to OpenAPI

Exporting the API metadata is very convenient for the purpose of generating documentation and client code for multiple languages like CSharp, JavaScript etc.

To export the API with all its operations using REST, we can click the ellipses (…) next to the API title and click “Export API”. At this point, we want to select of the OpenAPI standard. Most tools support both JSON and YAML formats

The export enables us to download all the operations in the format needed to properly document the APIs using tools like Swagger UI which shows all the API definitions and JSON payloads.

Conclusion

By using VS Code and Azure API Management service, we can quickly transform a legacy SOAP API into the modern OpenAPI standard without the need to re-code the API. Keep in mind however, that the SOAP API continues to be a system dependency under the hood. Nevertheless, we have taken an approach that can quickly help us provide a REST endpoint and use modern test and documentation tools to continue to support our SOAP APIs.

Thanks for reading.


Originally published by ozkary.com

9/12/20

Dataverse for Business Applications

With the improvements to the Microsoft 365 platform, there are ongoing changes and new concepts added to the platform. The former Common Data Service is now branded as the Dataverse.  This is a cloud-based solution that provides database and integration services to business applications hosted on Microsoft 365 Power Platform.  The main objective of Dataverse is to be the central data repository for all the business information, but this service is more than just a database service.

Dataverse


This service provides core features that can enable the rapid development of business solutions including those with low-code approach like PowerApps. This accelerates the building of business solutions by focusing only the application components and rely on the platform for the cross-cutting technical concerns.  The areas of these core features include security, logic, data, storage, and integration.

Security

Authentication is managed by Azure AD (Active Directory). The authorization feature provides support at the row and field level on a database. It also includes an auditing capability for compliance purposes.  This means that developers do not have to implement login features, permissions to access some data and creating audit logs to track activities on the data.  Of course, there may be some use cases that are not supported, and additional implementation would be required. But for the most part this should handle a high percentage of the security concerns for an application.

Logic

Business rules, duplicate detection, calculated fields and workflows at the data level are also supported. This enables the management of business logic to be centralized at the data level, so regardless of what application or API access the data, the same business logic is maintained.

Data

Dataverse also provides data transformation, data modeling, reporting, data validation features.  These features can help us shape the data in compliance with the needs of consumer applications or other systems. This also enables reporting tools like PowerBI to build better reporting by using the existent models or extending them based on the business need.

Storage

The data is stored in the Azure cloud in the form of Relational databases (SQL Server), files, blobs, semi-structure data, data lakes.  Depending on the type of solution we are building, there is plenty of storage methods that can be used. This enables us to centralize the data from other sources and different data formats.

Integration

There are multiple integration methods to support a business solution. We can use web hooks, APIs, event notification to build integration points with web application. There are also data export capabilities which can enables us to build a data warehouse or export data to a reporting system.

The Microsoft Dataverse provides many features and capabilities that can enable a development team to build business solutions much faster by focusing only on the application business components instead of the cross-cutting features. 

Technical Considerations

Like any technology, we need to also understand some technical considerations from the platform. The obvious one is that this is hosted on the Azure/Microsoft infrastructure, so there needs to be affinity with the Microsoft cloud platform.  This also works best for internal users as the security is managed by Azure AD.  Both of those considerations go very well when the business organization is already using the services from the Microsoft 365 platform, so there are probably platform experts within the organization.

We have covered just a few of the features of the Microsoft Dataverse service. There are so many other areas to understand and learn, but we have provided information on the basic areas that are related to building business applications for an organization.

Thanks for reading.

Originally published by ozkary.com

3/14/20

Redirect HTTP to HTTPS with JavaScript

On production environments, most websites are running under Hypertext Transfer Protocol Secure (HTTPS). This is an encrypted channel that is designed to keep the data between a client browser and server secured.  

When deploying a new website or application, we need to ensure that all traffic coming into the application is via the secure protocol (HTTPS). We should note that this is not available by default. For the most part, this is usually, and the preferred approach, a server side and/or domain registrar redirect rule.

In some cases, there are some difficulties which limits using the server side options. This can include limitations on what can be done on the cloud hosting environment or even lack of access to the domain registrar records. For those cases, we can detect the current protocol and redirect the traffic using client-side JavaScript code.  Let us review an approach by looking at this small snippet.


if (location.host.indexOf("localhost") < 0 

  && location.protocol.toLowerCase() !== "https:") {

    const url = `https://${location.host}`;

    location.replace(url);

}


This code snippet uses the location interface to validate the host name and protocol. If the protocol being used is not under a secured channel (HTTPS), it replaces the current location, essentially redirects, to the same host name, but it forces the secured channel.

Location Interface

The location interface is available globally and accessible via JavaScript. When using it, we could either use window.location or just location. It represents the location (URL, internet address) with all the relevant information that is visible on the browser address bar. This includes the host name and protocol information.

Host Name

The host name contains the current address or domain including port number.  We need this information to check that we are not running on localhost which is the case when we are running on development mode. We just want this rule to be enforced on production environments.

Protocol

The protocol indicates if we are using HTTP or HTTPS which is really what we are interested in finding out. We check that property, and If it does not match the secured channel, we compose a new address using the secured protocol and the host information.  Once we have the information, we are ready to execute a redirect.

Location Replace

With the new address information, we use location.replace to essentially redirect to a new location under the HTTPS protocol. It is important to use the replace method because we do not want to save the unsecured visit to our app in the session history. By using replace, we prevent the user from going back to that page via the back button. Now that we have the approach, where do we add this code?

Where to Place the Snippet

The snippet should run at the very start of the application bootstrapping process. Depending on the  application and framework being used (Angular, React, Vue etc.), we could choose to place this on the App.js file, but in most cases, we would prefer not to load our application instance yet and perform the redirect eagerly. For those cases, just include this file as a script reference on the main/index HTML page before loading the application code. Since JavaScript is single-threaded, the snippet executes first and forces the browsers to load the new secured location.


<head>    

 <meta http-equiv="Content-Security-Policy" 

        content="upgrade-insecure-requests">

</head>

<body>

    <div id="root"></div>    

    <script src="/js/redirect.js"></script>

    <script src="/js/app-bundle.js"></script>

 </body>


Content Security Policy (CSP)

We should also consider that by forcing the secured channel for our application, we should make sure that all the content (images, CSS)  be requested via the secured channel. To make sure this is done, we add the upgrade-insecure-requests policy as a meta tag in our page. This directive is evaluated to prevent the mixed-content warnings or even blocking due to a block-all-mixed-content policy enforce by browsers.

The solution to redirect HTTP to HTTPS from JavaScript is very simple but understanding the security policy implications on why we need to use a secured channel is a bit more complex. When evaluating that we need to redirect the requests, we need to consider other security concerns and validate that the redirect provides the intended results for the overall user experience.

Thanks for reading.

Originally published by ozkary.com

2/22/20

TypeScript TS7016 Could not Find Declaration Implicitly has any type

When building TypeScript modules, we may come across the TS7016 error. This error indicates that the modules being imported has no strongly typed definitions, and we are trying to use them in a project where type declaration is required. This is a more detail description of what this error may look like.


error TS7016: Could not find a declaration file for module './ozkary/ozkary.package'. '/ repos/aiengine/src/modules/speech/speech.package.js' implicitly has an 'any' type.


To clarify this error, this just really means that we are attempting to use a JavaScript (not well define types) file on a TypeScript (strongly-typed) project which essentially defeats the purpose. Do not panic yet, there are ways to solve this dilemma. Let us review our options.

Allow for Implicit Any Imports (tsconfig.json)

On a TypeScript project, there is a tsconfig.json file which provides all the information on how to compile the project.  The CompilerOptions node contains several configuration entries. By default, the NoImplicitAny settings is set to false, and it may not be visible on your settings.  This setting allows our project to use files and libraries that are purely written with JavaScript.  To override this error, we can add the value and set it to true as shown below:


"compilerOptions": {

    "module""commonjs",

    "noImplicitReturns"true,

    "noUnusedLocals"false,

    "outDir""lib",

    "sourceMap"true,

    "strict"true,

    "target""es2017",   

    "noImplicitAny"true


Use JavaScript Libraries with TS Support

If we are using TypeScript for a project, it is probably because we want to use a strongly-typed language. When this is the case, we need to use libraries that support TypeScript. If a package we are using is causing this error, we need to look at the latest package updates and see if the latest version do have TypeScript support.  If this is not the case, then overriding the behavior on the tscofig.json file is the fallback option.

Ensure the File Extension is TS not JS

This may seem obvious, but this is a common mistake. When adding new files to the TypeScript project, we need to make sure the file extension is TS not JS. This tiny mistake for sure raises the TS7016 error. It is sometime important to observe and take a close look at the file extension when we see this error.

Strongly Typed Classes instead of Function Components

Using TS files extensions is not enough to indicate that our classes are strongly type. We also need to refactor our code to follow the TypeScript standards. This means replacing JavaScript function component declarations with interfaces and classes that declare strongly type data members.

I hope this was helpful and that it can help in resolving this error from your project. Feel free to add more suggestions on resolving this error on the comments sections.

Thanks for reading.

Originally published by ozkary.com