A SOAP WSDL (Web Service Description Language) is an
XML-based interface description language that is widely used by older APIs.
With the modernization of Web standards, most APIs today use REST (Representational
state transfer) and JSON (JavaScript Object Notation). In some cases, there may be a need to convert
a SOAP API to REST without having to refactor the API. Luckily for us, Web development
tools and Azure can help us get this done.
Azure API Management Service
With the evolution of Web tooling and Cloud computing, we
can continue to use SOAP APIs by importing a WSDL definition and creating an
OpenAPI (JSON) definition using Visual Studio Code (VS Code) and Azure API
Management service. Let us see how we can quickly do this.
We first need to open VS Code and have an Azure
subscription. We can get a free Azure subscription by visiting azure.com. Once VS Code is running,
we need to install the Azure API management extension from the extension’s
menu. This extension enables us to
connect to Azure and provision new API services.
From the Azure API Management extension menu (Azure Icon –
Left Bar), select the target subscription. Resources need to be created under a
subscription. Right click and select Create “API management in Azure”. This action opens an edit box on VS Code
command palette (top-center) which prompts for the API name. We should try to use something that is unique
to your brand or company to avoid name collisions from other users.
After the API management service is provisioned, the VS Code
extension should display the recently created service. At this point, we can
add a new API from a WSDL document. To do that and due to limitations on this
extension, we need to open the API service from the Portal. We can do this by doing a right click on the
API service name and selecting “Open in Portal”.
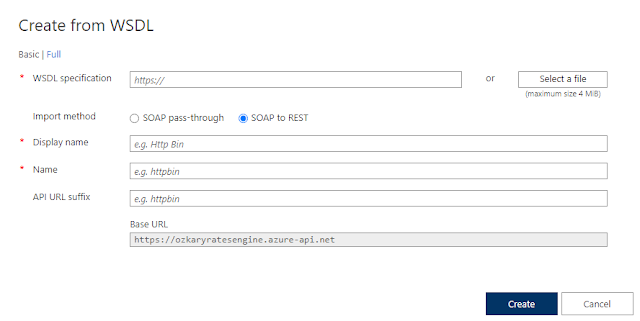
Once the Azure Portal loads on the browser, we can click on the “Add API” menu option. This action loads a view which shows all the supported standards.
For our case, we should select WSDL. At this point, we need
to have either a link or the actual WSDL file.
We also need to have the single WSDL file that contains all the web operations. We can easily get that file by loading the
SOAP API endpoint with the URL parameter singleWsdl as shown below:
|
https://api.ozkary.com/endpoint.svc?singleWsdl |
Note: Replace the URL with the target endpoint
When we have either a link or the actual file, we can import
it into the Azure API Management console. For the import process, select the “SOAP to REST”
option. This option enables us to convert the XML metadata into a REST metadata
which is used to build the Web operations with JSON. We should also use the API URL suffix to
separate different areas of the APIs. This appends the suffix to the endpoint-based
URL.
Recursive Error
|
Error: Parsing
error : Unable to import API from WSDL: Element named
'http://schemas.ozkary.com/sample.xsd:Product' has a recursive
definition. Recursive types are not supported. |
If there is a recursive error, the import will not be able
to complete the process. The error indicates that in one of the SOAP
complex types, there is a property that has itself as type definition, and this
causes the engine to do a recursive look up. This leads to infinite lookups which
will never end thus causing the error.
The only way to fix this error is to change the complex type definition
by removing the recursive type reference.
To illustrate this problem, let us look at an example. In the
following Product complex type, we can see that there is a Product property
which uses the same type (Product). This causes a recursive error as it
endlessly looks at the type definition.
|
<xs:complexType name="Product"> <xs:sequence> <xs:element minOccurs="0" maxOccurs="1" name="Name" type="xs:string"/> <xs:element minOccurs="0" maxOccurs="1" name="SKU" type="xs:string"/> <xs:element minOccurs="0" maxOccurs="1" name="Product" type="tns:Product"/> </xs:sequence> </xs:complexType> |
Testing the API
Once the WSDL is processed successfully, we can now look at
the operations from the portal and even test them using the REST format. This would be like how we can test using
Postman or Swagger UI. Note that there
are two ways of testing the API. We can either use the Azure Portal or go back
to VS Code and test the operations from the IDE. Independently of the selected
method, the goal is to validate that the REST endpoint work.
Exporting to OpenAPI
Exporting the API metadata is very convenient for the purpose
of generating documentation and client code for multiple languages like CSharp,
JavaScript etc.
To export the API with all its operations using REST, we can
click the ellipses (…) next to the API title and click “Export API”. At this
point, we want to select of the OpenAPI standard. Most tools support both JSON
and YAML formats
The export enables us to download all the operations in the
format needed to properly document the APIs using tools like Swagger UI which
shows all the API definitions and JSON payloads.
Conclusion
By using VS Code and Azure API Management service, we can
quickly transform a legacy SOAP API into the modern OpenAPI standard without
the need to re-code the API. Keep in mind however, that the SOAP API continues
to be a system dependency under the hood. Nevertheless, we have taken an
approach that can quickly help us provide a REST endpoint and use modern test
and documentation tools to continue to support our SOAP APIs.
Thanks for reading.


0 comments :
Post a Comment
What do you think?