10/15/22

API CORS Support with Azure API Management

In a Single Page Applications architecture, APIs are used for the application integration with a backend service. When both the SPA and API are hosted on the same domain name, the integration is simple, and the client application can call the APIs directly. When the SPA and API are hosted on different domains, we have to create Cross Domain Access Sharing CORS policies to authorize the client app to access the API. Otherwise, the client application is blocked from calling the APIs.

In cloud platform scenarios, the API is accessible via a gateway, which it is often used to protect the access to internal APIs by enforcing security policies like CORS and IP whitelisting. A very common use case is illustrated below:

okary-apim-cors

On this diagram, we have an SPA application hosted in the app.ozkary.com domain. The app needs to integrate with an internal API that is not available via a public domain. To enable the access to the API, a gateway is used to accept inbound public traffic. This gateway is hosted on a different domain name, api.services.com. Right away, we can expect to have a cross domain problem, which we have to resolve. On the gateway, we can apply policies to allow an inbound request to reach the internal API.

To show a practical example, we need to first review what is CORS and why it is important for security purposes. We can then talk about why we should use an API gateway and how to configure policies to protect an API.

What is CORS?

Cross-Origin Resource Sharing is a security feature supported by modern browsers to enable applications hosted on a particular domain to access resources hosted on different domains. In this case, the resource that needs to be shared is an API via a web request. The way a browser enforces this process is by creating a preflight request to the server before actually sending the request. This is the process to check if the client application is authorized to make the actual request.

When the app is ready to make a request to the API, the browser sends an OPTIONS request to the API, a preflight request. If the cross-origin server has the correct CORS policy, an HTTP 200 status is returned. This authorizes the browser to send the actual request with all the request information and headers.

okary-apim-cors-preflight


For the cross-origin server to be configured properly, the policies need to include the client origin or domain, the web methods and headers that should be allowed. This is very important because it protects the API from possible exploits from unauthorized domains. It also controls the operation that can be called. For example, a GET request may be allowed, but a POST request may not be allowed. This level of configuration helps with the authorization of certain operations, like read only, at the domain level. Now that we understand the importance of CORS, let's look at how we can support this scenario using an API gateway.

What is Azure API Management?

The Azure API Management service is a reverse proxy gateway that manages the integration of APIs by providing the routing services, security and other infrastructure and governance resources. It provides the management of cross-cutting concerns like security policies, routing, document (XML, JSON) transformation, logging in addition to other features. An APIM can host multiple API definitions which are accessible via an API suffix or route information. Each API definition can have multiple operations or web methods. As an example, our service has a telemetry and audit API. Each of those APIs have two operations to GET and POST information.

  • api.services.com/telemetry
    • GET, POST operations
  • api.services.com/audit
    • GET or POST operations

For our purpose, we can use the security features of this gateway to enable the access of cross-origin client applications to internal APIs that are only accessible via the gateway. This can be done by adding policies at the API level or to each API operation. Let's take a look at what that looks like when we are using the Azure Portal.

ozkary-azure-apim-setup


We can add the policy for all the operations, or we can add it to each operation. Usually, when we can create an API, all the operations should have the same policies. For our case, we apply the policy at the API level, so all the operations are covered under the same policy. But exactly, what does this policy looks like? Let's review our policy and understand what is really doing.

For our integration to work properly, we need to configure the following information:

  • Allow the app.ozkary.com domain to call the API by using the allowed-origins policy. This shows as the access-control-allow-origin header on the request response.
  • Allow the OPTIONS, GET AND POST HTTP methods by using the allowed-methods policy. This shows as the access-control-allow-methods header on the request response.
  • Allow the headers Content-Type and x-requested-by by using the allowed-headers policy. This shows as the access-control-allow-headers header on the request response.

Note: The request response can be viewed using the browser development tools, network tab.

This policy governs the cross-origin apps and what operations the client can use. As an example, if the client application attends to send a PUT or DELETE operation, it will be blocked because those methods are not defined in the CORS policy. It is also important to note, that we could use a wildcard character (*) for each policy, but this essentially indicates that any cross-origin app can make any operation call. Therefore, there is really no security, which is not a recommended approach. The use of wildcards should be done only during the development effort, but it should not be used in production environments.

After Adding the Policy CORS Does not Work

In some cases, even when the policy is configured correctly, we may notice that the policy is not taking effect, and the API request is not allowed. When this is the case, we should look at the policy configuration in all the levels. In Azure APIM, there are three levels of configuration:

  • All APIs - One policy to all the API definitions
  • All Operations - All the operations under one API definition
  • Each Operation - One specific operation

We may think that the configuration at the operation level should take precedence, but this is not the case if there is a <base/> entry, as this indicates to use the parent configuration and apply it to this policy. To help prevent problems like this, make sure to review the high level configurations, and if necessary remove the <base/> entry at the operation level.

Conclusion

A CORS policy is a very important security configuration when dealing with applications and APIs that are hosted in different domains. As resources are shared across domain, it is important to clearly define what cross-origin clients can access the API. When using a cloud platform to protect an API, we can use an API gateway to help us manage the cross-cutting concerns like a CORS policy. This helps us minimizes risks and provides enterprise quality infrastructure.


Send question or comment at Twitter @ozkary

Originally published by ozkary.com

9/17/22

Create API Mocks with Azure APIM and Postman Echo Service

When kicking off a new API integration project, we often star by getting the technical specifications on the external API. The specifications should often come in the form of an OpenAPI Specification or a JSON schema definition. It is often the case, that the external API may not be available for the implementation effort to start. This however should not block our development effort because we can create API mocks without much development effort. The mocks can echo back our original request with the same JSON document model or with some modifications.

We are going to work on a simple telemetry digest API and see how we can create a mock. But before, we look at the solution, let’s review some important concepts. This should help us have more background on what we are trying to achieve and understand the tooling that we are using.

What is OpenAPI Specifications

The OpenAPI Specifications (OAS) is a technical standard for defining RESTful API in a declarative document, which allows us to clearly understand the contract definitions, and the operations that are available on that service. The OpenAPI Specification was formerly known as the Swagger Specifications, but it has been adapted as a technical standard, and it was renamed.

The specification is often written using YAML, which is a human-readable text file that is heavily used on infrastructure configuration and deployments. In our case, we will be using this following YAML, to understand a simple service.

ozkary-openapi

👍 Use Swagger.io to create an OpenAPI specificastion doument like the one above.

What is Postman and the Echo APIs

Postman is a development tool that enables developers to test APIs without having to do any implementation work. This is a great approach as it enables the development team to test the API and clearly understand the technical specifications around security and contract definitions.

Postman provides several services. There is a client application that should be used to create a portfolio of API requests. There is also an ECHO API service that enables team to create mocks by sending the request to that service, which, in turn, echoes back the request with additional information.

When an external API is not available, we can use the ECHO API to send our HTTP operations to quickly create realistic mocks for our implementation effort as this integrates with external services, and we can make changes to the JSON response to mock our technical specifications.

👍 Note:  Use https://postman-echo.com/post for the Echo API


ozkary-postman


What is Azure API Management

The Azure API Management service is a reverse proxy gateway that manages the integration of APIs by providing the routing services, security and other infrastructure and governance resources.  It provides the management of cross-cutting concerns like security policies, routing, document (XML, JSON) transformation, logging in addition to other features.

For our purpose, we can use the YAML specification that was previously defined to create a new API definition, as this is supported by Azure APIM. By importing this document, a new API is provisioned with the default domain (or custom domain for production environments) on the service plus the API routing suffix and version, which defines the RESTful route on the URL. An example of this would be:

api-ozkary.azure-api.net/telemetry/v1/mock

In the lifecycle of every request, APIM enable us to inspect the incoming request, forward the request to a backend or external service and inspect or transforms the outbound response back to the client application. The inbound and outbound process are the steps in the API request lifecycle that we can leverage to create our API mocks.

ozkary-apim-steps


Look at a Simple API Use Case

We can now move forward to talk about our particular use case. By looking at the YAML document, we can see that our API is for a simple telemetry digest that we should send to an external API.

Each telemetry record should be treated as a new record; therefore, the operation should be an HTTP POST. As the external service processed the request, the same document should be returned to the client application with the HTTP status code of 201, which means that the record was created.

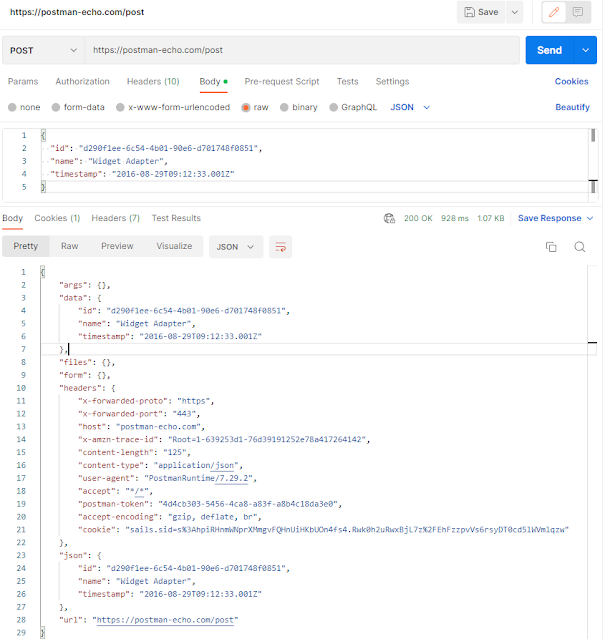
For our case, the Postman Echo API adds additional data elements to our document. Those elements are not needed for our real implementation, so we will need to apply a document transformation on the outbound steps of the request lifecycle to return a document that meets our technical specifications.

As you can see on the image below, the response from the Postman echo service returns our request data in the data property, but it also adds other information which may not be relevant to our project.

Create a Mock to Echo the Requests

Once the YAML is imported into Azure APIM, we can edit the API policies from the portal. To mock our simple telemetry digest, we need to add policies to both the inbound and outbound processing steps. The inbound step is used to change the inbound request parameters, headers and even the document format.  In this case, we need to change the backend service using the set-backend-service policy and send the request to the postman-echo.com API. We also need to rewrite the URI using the rewrite-uri policy and remove the API URL prefix. Otherwise, that will be appended automatically to our request to the Echo API, which will cause a 404 not found HTTP error.

When the response comes back from the Echo API, we need to transform the document in the outbound processing step. In this case, we need to serialize the body of the response, read the data property, which holds the original request, and return only that part of the document. For this simple implementation, we are using a C# script to do that. We could also use a liquid template to do something similar. Liquid templates provide a declarative way to transform the JSON response. It is a recommended approach when we need to rename properties and shape the document differently, which in some cases can get very complex. When using the C# code approach the code can get very hard to maintain.

👍 Note: The C# capabilities on Azure API are very limited. When applicable, the use of liquid templates is recommended.

Conclusion

With every new integration project, there is often the need to mock the APIs, so the implementation effort can get going. There is no need to create some API mock project that requires a light implementation and some deployment activities. Instead, we can use Azure API Management and Postman echo APIs to orchestrate our API mocks. By taking this approach, we accelerate and unblock our development efforts using enterprise quality tooling.

Thanks for reading.

Send question or comment at Twitter @ozkary

Originally published by ozkary.com

8/20/22

Improve User Experience with React Code Splitting and Lazy Loading Routes

When building single page applications, SPA. The application load time performance is very important as this improves the user experience. As development teams mostly focus on functional requirements, there is a tendency to skip some of the non-function requirements like performance improvements. The result is that when a web application is loaded, all the resources including views that are not visible on the home page are downloaded in a single bundle. This is referred as eagerly loading, and this approach often causes a slow load time as all the resources need to be downloaded before the user can interact with the application.


ozkary-lazy-loading-routes

To avoid this performance issue, we want to only load the resources that are needed at the time that the user is requesting it, on demand. As an example, only load the resources for the home page without loading other page resources, thus improving the load time. This is usually called lazy loading. To support this, we need to load chunks of the application on demand.  A chunk is basically a JavaScript or CSS file that packages only the containers, components and dependencies that are needed for that view to render.

To lazy load the different views for an application, we need to implement the concept of Code Splitting, which basically enables us to split the code bundle into chunks, so each container view and dependencies can be downloaded only as the user is requesting it. This greatly improves the app performance because the chunk size is small compared to the entire code bundle.

Importing Container Views and Routing

A simple yet very important approach to improve load time performance is to lazy load the routes. This is a code split process, which breaks down each container view into a separate chunk. In addition, components within these containers can also be lazy loaded to break down further the size of each chunk.

To get started, let’s look at what the navigation configuration of React application looks like, so we can review what takes place when a user loads the application.

ozkary-react-container-views

In this example, we should notice that our React app has three main containers, which are basically the pages or views that the user can load from the app.  These containers are usually in the container folders of the project file structure. This path is important because it is needed to associate them to a route.

👍 Pro Tip: It is a best practice to plan your folder structure and create a folder for each container, components, elements, and services.

To loads those views, we need to import them and map them to an application route. This should be done on the application starting point, which should be the App.tsx file. The code to do that looks like this:

In this code, we are using the import directives to load each container view. Each of those views is then mapped to an application route directive. When using import directives, there is no optimization, so we should expect that when this app loads on the browser, all the views should be loaded in a single bundle. To clearly see this, let’s use the browser dev tools to inspect how this look at the network level.


ozkary-app-loading-single-bundle


By doing a network inspection, we can see that there is a bundle.js file. This file has a 409kb size. In the example of a simple app, this is not bad at all, but for real world apps, this bundle size may be much bigger than that, and eventually it impacts the load time. A benefit of using a single bundle is that there are no additional trips to download other file chunks, but this approach will not let your application scale and perform acceptably over time.

Lazy Loading Container Views

Now, we should be able to understand that as the app continuous to grow, there is potential performance challenge, so the question is how can be optimized the loading of our application? The simple answer is that we need to Code Split the bundle into smaller chunks. A quick approach is to Lazy Loading the routes. This should enable us to improve the load time with very small code changes. Let modify our previous code and look at the performance difference.

In the updated version of our code, we are now using the lazy direct to delay the import of the container view only when the user requests that route. The rest of the code remains the same because we are still using the same container references and mapping them to a route. OK, let’s run the app and do another network inspection, so we can really understand the improvement.


ozkary-app-lazy-loading-routes


In this last trace, we can see there still a bundle file with roughly the same size of the file as before. This bundle file contains the optimization code to map a route to a particular bundle chunk. When a particular route is loaded, home route is loaded by default, the chunk for that view is downloaded, notice the src_container_Home_index_tsx.chunk.js. As the user navigates to other routes, the additional chunks are downloaded on demand, notice the Analytics and Admin chunks.

Final Thoughts

With this simple app, we may not be able to truly appreciate the optimization that has been done by just deciding to lazy load the containers. However, in real-world applications, the size of a single bundle will quickly get big enough to impact the usability of the application as users will have to wait a few or several seconds before the app is clickable. This is referred to as Load Time.

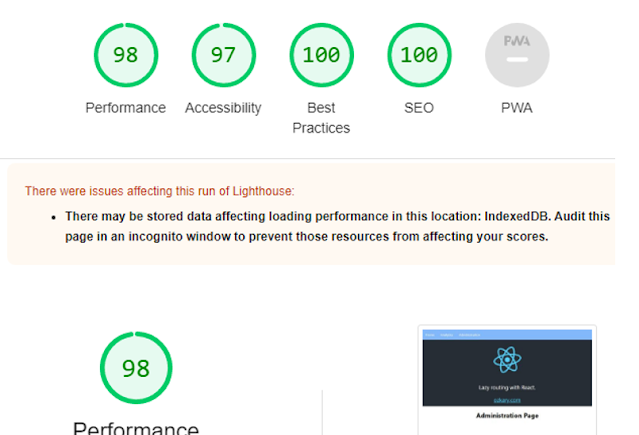
In addition, build tools for framework like React show performance warnings when loading the application in the development environment, as it tracks some performance indicators like load time. Also, it is a good practice to use a tool like Lighthouse, in the browser dev tools, to run a report and measure performance indicators like load time, render time and others.

ozkary-app-performance-report


👍 Pro Tip: Always use a performance tool to measure performance and other industry best practices for web applications.

With a bit of performance planning, we can feel confident that we are building an app that will scale and perform as additional business requirements are added, and the app will provide a much better user experience by improving the overall load time.

Send questions or comments at Twitter @ozkary

Originally published by ozkary.com

7/23/22

How to Manage JavaScript Project Dependencies with NPM


When working with JavaScript projects, we use the Node Package Manager (NPM) to manage our package dependencies. NPM is a Command Line Interface (CLI) tool that enables developers to add, remove, and update package dependencies in our projects.


Due to security vulnerabilities, bugs and enhancements, there is a high frequency of updates on these dependencies, and developers need to keep track of those updates to avoid accumulating technical debts on their projects, or even worse, to allow for a security vulnerability to continue to run on a production environment.


ozkary update project depencies with npm

With this understanding, it is important to be familiar with the process to keep a JavaScript project up to date with the latest package updates. This enables us to clearly understand the steps that are required to check on the dependencies’ configuration, outdated versions, commands to manage the updates, and what to do to force an upgrade to major versions.


Understand the Project Dependencies


To get a better understanding of how to manage our project dependencies, we need to understand how a project is configured. When using NPM to manage a React, Angular or other JavaScript framework project, a package.json file is created. This file host both the release and development dependencies, the latter is used only for tooling to aid in the development and build effort and are not deployed.


The one area to notice from this file is how the semantic version (semver) range rules are defined. Basically, these rules govern how far ahead in new versions a dependency can be updated. For example, look at the following configuration:


"scripts": {

    "build": "tsc",

},

"dependencies": {

    "jsonwebtoken": "^8.5.1",    

    "mongoose": "~5.3.1",

    "node-fetch": "^2.6.7"

  },

  "devDependencies": {

    "@azure/functions": "^3.2.0",

    "@types/jsonwebtoken": "^8.5.9",

    "eslint": "^7.32.0",

    "jest": "^26.6.3",

    "typescript": "^4.8.2"

  }


The dependency version is prefixed with a notation, most commons characters are the caret (^) for minor versions and tilde (~) for patch versions. These characters are designed to limit a project upgrade to only backward compatible versions, for example:


  • ^8.5.1 Can only upgrade up to the max minor version 8.x.x but never to 9.x.x
  • ~5.3.1 Can only upgrade to the max patch version 5.3.x but never to 5.4.x


It is important to follow the semver governance to maintain backward compatibility in your projects. Any attempts to upgrade to a major release will introduce breaking changes, which can require refactoring of the code.


Check for Outdated Versions


Now that we understand how a project is configured, we can now move forward to talk about how to check for outdated dependencies. To check all the version on our project, we can run the following npm command:


> npm outdated


This command reads the package.json file and checks the version of all the dependencies. In the image below, we can see the output from this command:


ozkary npm outdated output


The output shows each package name, its current version, the wanted version which is governed by the semver range, and the latest package available. Ideally, we want to upgrade to the latest package available, but if that version is not within your semver range, there is the risk of many breaking changes, which requires some code refactoring. 


Note: Notice the font color on the package name, red indicates that an update is required


Update the Dependencies


So far, we have identified that some packages are behind in updates or outdated. The next step is to use npm and apply the update to our project, which is done by using another npm command:


> npm update

 Note: In Linux and WSL, if you see the EACCES error, grant the current user permissions by typing this command: sudo chmod 700 /folder/path


The update command reads all the packages and applies the new version following the semver range rules. After running the command, the output, if no errors were found, should look like the following images:


ozkary npm outdated with latest packages


From this output, we can see that all the current versions match the wanted version. This basically means that the current version is updated with the latest minor release for that version. This is the safe way to update of the dependencies, but overtime, there will be a need to force your project to update to a new major release. How do we do that?


How to Upgrade to a Major Version


In some cases, there may be a security vulnerability, a feature that does not exist in the minor version, or just is time to keep up with the latest version, and there is a need to move up to the next major version or even the latest version. Most of the time, it is sufficient to move to the next major version when the project is not too far behind updates.


When this is the case, we can force update a version by running another npm command, which help us upgrade to a specific version or the latest one.


> npm install –save package-name@3.0.0

or

> npm install –save package-name@latest


The install command is not bound by the semver constraint. It installs the selected version number or the latest version. We also provide the –save parameter to save the changes to the package.json file, which is really important for the next update. This will update the reference to the new version number.


When upgrading to a new major version, there are some risks in introducing some breaking changes. Usually, these changes are manifested on deprecated functionality that may no longer exists or operate differently. This forces the dev team to have to refactor the code to meet the new technical specifications.


Verify the Updates


After applying the dependency update to a project, it is important to verify that there are no issues with the update, especially when upgrading to a major version. To verify that there are no issues, we need to build the project. This is done by using the build script in the package.json file and running the command npm run build


"scripts": {

    "build": "tsc",

},


> npm run build


The package.json file has a script node where we can define commands to run the build, test cases and code formatting tasks. In this example, tsc stand for TypeScript Compiler. It builds the project and check for any compilation issues. If there are any compatibility problems, the output of the build process will indicate where in the code to find the problem.


The npm run command enables us to run the script that are defined within the script node of the package.json file. In our case, it runs the tsc command to do a build. This command may look different in your project.


Conclusion


When we start a new project, we use the current package versions that are available from the npm repository at that time. Due to security vulnerabilities and software updates, there is a high frequency of updates in these JavaScript packages. Some of these new versions are backward compatibles, others are not. It is always an issue of technical debt when we let our projects get far behind in updates, so we most frequently check for outdated software and plan for major version updates when necessary. Therefore, become one with npm and use it to help manage a project package dependency.


npm run happy coding


Send question or comment at Twitter @ozkary

Originally published by ozkary.com

5/14/22

Improve App Performance with In-Memory Cache and Real-Time Integration


In the presentation, we discuss some of the performance problems that exists when using an API to SQL Server integration on a high transaction systems with thousands of concurrent clients and several client tools that are used for statistical analysis.

ozkary-telemetry

Telemetry Data Story

Devices send telemetry data via API integration with SQL Server. These devices can send thousands of transactions every minute.  There are inherit performance problems with a disk-based database when there are lots of writes and reads on the same table of a database. 

To manage the performance issues, we start by moving away from a polling system into a real-time integration using Web Sockets. This enables the client application to receive events on a bidirectional channel, which in turns removes the need to have to poll the APIs at a certain frequency.

To continue to enhance the system, we introduce the concept of an enterprise in-memory cache, Redis. The in-memory cache can be used to separate the reads and writes operations from the storage engine. 

At the end, we take a look at a Web farm environment with a load balancer, and we discuss the need to centralize the socket messages using Redis Publish and Subscribe feature. This enables all client with a live connection to be notified of the changes in real-time.

ozkary-redis-integration

Database Optimization and Challenges

Slow Queries  on disk-based storage
  • Effort on index optimization
  • Database Partition strategies
  • Double-digit millisecond  average speed (physics on data disks)
Simplify data access strategies
  • Relational data is not optimal for high data read systems (joins?)
  • Structure needs to be de-normalized
  • Often views are created to shape the data, date range limit

Database Contention
  • Read isolation levels (nolock)
  • Reads competing with inserts

Cost to Scale
  • Vertical and horizontal scaling up on resources
  • Database read-replicas to separate reads and writes
  • Replication workloads/tasks
  • Data lakes and data warehouse

What is Socket.io, WebSockets?

Enables real-time bidirectional communication.
Push data to clients as events take place on the server
Data streaming
Connection starts as HTTP is them promoted to WebSockets 


Why Use a Cache?

  • Data is stored in-memory
  • Sub-millisecond average speed
  • Cache-Aside Pattern
    • Read from cache first (cache-hit) fail over to database (cache miss)
    • Update cache on cache miss
  • Write-Through
    • Write to cache and database
    •  Maintain both systems updated
  • Improves app performance
  • Reduces load on Database

What is Redis?

  • Key-value store, keys can contain strings (JSON), hashes, lists, sets, & sorted sets
  • Redis supports a set of atomic operations on these data types (available until commited)
  • Other features include transactions, publish/subscribe, limited time to live -TTL 
  • You can use Redis from most of today's programming languages (Libs)
Code Repo

Send question or comment at Twitter @ozkary

Originally published by ozkary.com

4/30/22

Visual Studio Code C++ Development

Visual Studio Code (VSCode) is a software development tool that is used to program in multiple programming languages. It is also a cross-platform integrated development environment tool (IDE) which runs on Linux, Windows and MacOS.  To use VSCode for a particular programming language, we need to install the corresponding extensions, which enables VSCode to load all the tools to support the selected language. When programming in C++ , we need to install the VSCode extension as well as a compiler that can enable to compile the source code into machine code.

ozkary-vscode-c++

Install the Extension

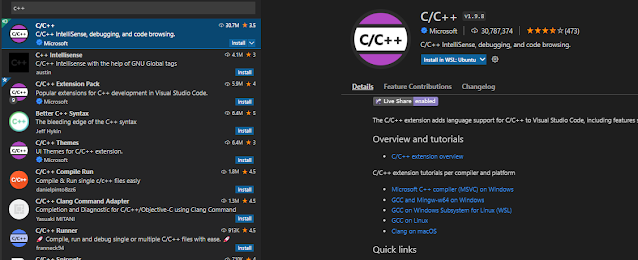
VSCode works with extensions, which are libraries to support languages and features. To be able to code in C++, we need to install the C++ extension. This can be done by searching for C++ from the Extensions view. From the search result, select the C/C++  extension with intellisense, debugging and code browsing. Click on the install button.

When reading the details of this extension, we learn that it is a cross-platform extension. This means that it can run on multiple operating systems (OS). It uses the MSVC and GCC compilers on Windows. The GCC compiler on Linux, and Clang on macOS. C++ is a compiled language, which means that the source code must be compiled into machine code to run on our machines.

Verify the Compiler

The extension does not install the compiler, so we need to make sure that a compiler is installed. To verify this, we can open a terminal from VSCode and type the command to check the compiler version.


// for Linux and Windows

g++ --version

// macOS

clang –version


The output of that command should show the compiler version. If instead, the message is command not found, this means that there is no compiler install, and you can move forward with installing the correct one for your target OS. Use GCC for Linux and Windows (or MinGW-x64), and clang for macOS.

Write a Hello World Sample

Once the compiler is ready on your workstation, we can move forward and start writing some code. Let’s start by creating a simple Hello World app using C++.  To do that, follow these steps:

  • Create a new folder. This is the project folder.
  • Open the folder with VSCode
  • Add a new file, name it helloworld.cpp

We should notice the CPP file extension. This is the extension use for C++ files. The moment we create the file, the extension that we previously installed should identify it and provide the programming language support.

Now, we can add the following code to the file. This code shows some basics of a C++ application.

  • Use include to import library support to the app.
  • Use using to bring of the operations into the global scope.
  • Declare the main() application entry point
  • Use the standard console output to display our message
  • Exit and stop the code execution

Compile and Run the Code

We should now have our simple Hello World app code written. The next step is to compile and run the application.  We can do that by following these steps from the terminal window:

Note: Run these commands from the folder location


// compiles the code and creates the output file which is a standalone executable


g++ ./helloworld.cpp -o appHelloWorld 

// runs the application

./appHelloWorld


The first command compiles the source code into machine code. It links the libraries, include declarations, to the output file or assembly. By looking at the project folder, we should see that a new file was created.

After the code is compiled, we can run the application from the terminal. The app should run successful and display the hello message. We should notice that this is a standalone application. It does not require any runtime environment like JavaScript, Python and other programming languages require.

Conclusion

VSCode is an integrated development environment tool that can enable us to work with different programming languages. It is also a cross-platform IDE, which enables programmers with different operating systems to use this technology. To work with a specific programming language, we need to install the corresponding extension. In the case of C++, we also need to install the compiler for the specific operating system.  Let me know if you are using C++ with VSCode already and if you like or dislike the experience.


Send question or comment at Twitter @ozkary

Originally published by ozkary.com

3/28/22

Visual Studio Code Online - Quick Intro

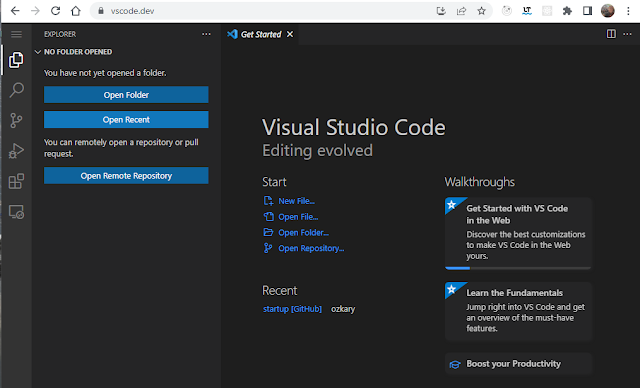
Visual Studio Code (VSCode) Online is a browser hosted IDE for software development purposes. It works similarly as the full version of VSCode.  You can access VSCode Online by visiting https://vscode.dev.  

ozkary vscode online


After the IDE is loaded on your browser, you can connect to any GitHub repo, including repos from other services. As the project loads, you are able to interact with the files associated to the project. These files can be JavaScript, TypeScript, CSharp or any other programming language associated to the project.

As a developer, you are able to browse the files, make edits commit and push back the changes to your repo. In addition, you can debug, do code comparison or load other add-ons to enable other development activities.

This service is not meant to replace your development environment, but is an additional tool to enable your work. Do take a look, and let me know what you think by sending my a message at Twitter @ozkary

Take a look at this video for a quick demo of the tool.


Send question or comment at Twitter @ozkary

Originally published by ozkary.com

3/12/22

Orchestrate Multiple API Calls in a Single Request with an API Gateway

When building apps, a common integration pattern is the use of the microservice architecture. This architecture enables us to create lightweight loosely-couple services, which the app can consume and process the information for specific purposes or workflows.

Sometimes, we do not control these microservices, and they can be designed in such a way that the information is fragmented in multiple steps. This basically means that to get a specific domain model, we may need to orchestrate a series of steps and aggregate the information, thus presenting a bit of an architectural concern.

Unfortunately, orchestration of microservices on the app leads to code complexity and request overhead, which in turns leads to more defects, maintenance problems and slow user experience. Ideally, the domain model should be defined in one single microservice request, so the app can consume it properly. 

For these cases, a good approach is to use an orchestration engine that can handle the multiple requests and document transformation. This enables the app to only make one single request and expect a well-defined domain model. This approach also abstracts the external microservices from the app, and applies JSON document transformation, so the application never has to be concerned with model changes.

To handle this architecture concern, we look at using an API Gateway to manage the API orchestration, security and document transformation policy which handles the document aggregation and domain model governance.

Client to Provider Direct Integration

See the image below for a comparison between an architecture where the app calls microservices directly. This forces the application to send multiple requests. It then needs to aggregate the data and transform it into the format that it needs. There are a few problems with this approach. There is traffic over head from the browser to the provider as multiple requests are made. The app is also aware of the provider endpoint, and it needs to bind to the JSON documents from the provider. By adding all these concerns to the app, we effectively must build more complex code in the app.

Client to Gateway Proxy Integration

On the other approach. The app integrates directly to our gateway. The app only makes one single request to the gateway, which in turns orchestrate the multiple requests. In addition, the gateway handles the document transformation process and the security concerns.  This helps us remove code complexity from the app. It eliminates all the extra traffic from the browser to the provider. The overhead of the network traffic is moved to the gateway, which runs on much better hardware.

ozkary api orchestration

We should clarify that this approach is recommended only when the microservices have fragmented related data. Usually a microservice handles a single responsibility, and the data is independent of other microservices.

Let me know what you have done when you have faced a similar integration and what is the result of your story.

Send question or comment at Twitter @ozkary

Originally published by ozkary.com

2/12/22

Reduce code complexity by letting an API Gateway handle disparate services and document transformation

Modern Web applications use the microservice architecture for their API service integration. These APIs are often a combination of internal and external systems. When the system is internal, there is better control of the API endpoints and contract payload which the front-end components consume.  When there are external systems, there is no real control as the endpoints and contracts can change with new version updates.

There are also cases when the integration to these external integrations must be done with multiple providers to have some redundancy. Having to integrate with multiple providers, forces the application to manage different endpoints and contracts that have different structure. For these cases, how does the client application know what API endpoint to call? How does it manage the different structure and formats, JSON or XML, on both the request and response contracts? What is the approach when a new external service is introduced? Those are concerning questions that an API Gateway can help manage.

What is an API Gateway?

An API Gateway is an enterprise cloud solution that integrates client applications to back-end services or APIs. It works as a reverse proxy which forwards inbound requests to internal or external services. This approach abstracts the service's endpoint details from the application; therefore, an application only needs to be aware of the gateway endpoint information.  

When dealing with disparate services, an application must deal with the different contracts and formats, JSON, XML, for the request and subsequent response. Having code on the application to manage those contracts, leads to unmanageable and complex transformation code. A gateway provides transformation policies that enables the client application to only send and receive one contract format for each operation. The gateway transformation pipeline processes the request and maps it to the contract schema required by the service. The same takes place with the response, as the payload is also transformed into the schema expected by the client application. This isolates all the transformation process in the gateway and removes that concern from the client.

API Settings

To better understand how an API Gateway can help our apps avoid a direct connection to the services, we should learn about how those services and their operations should be configured.  To help us illustrate this, let’s think of an integration with two disparate providers, as shown on the image below.


ozkary API Gateway


The client apps can be using the APIs from either Provider A or B. Both providers are externally located in a different domain, so to manage the endpoint information, the apps are only aware of the gateway base URL.  This means that independently of how many providers we may add to this topology, the clients always connect to the same endpoint.  But wait, this still leaves us with an open question. How is the routing to a specific provider handled?

Operation Routing

Once we have the base URL for the gateway endpoint, we need to specify the routing to the API and specific operation. To set that, we first need to add an API definition to the gateway. The API definition enables us to add an API suffix to the base URL. This suffix is part of the endpoint route information and precedes the operation route information.

An API definition is not complete unless we add the operations or web actions which handle the request/response. An operation defines the resource name, HTTP method and route information that the client application uses to call the API endpoint in the gateway. Each route maps to an operation pipeline which forward requests to the provider’s API endpoint and then sends the response back to the client. In our example, the routing for the operation of Provider A looks as follows:

ozkary API Gateway Operation Pipeline

This image shows us how an API has a prefix as well as operations. Each of the operations is a route entry which completes the operation URL path. This information, plus the base URL, put together handles the routing of a client request to a particular operation pipeline, which runs a series of steps to transform the documents and forward the request to the provider’s operation.

Note: By naming the operations the same within each API, only the API suffix should change. From the application standpoint, this is a configuration update via a push update or a function proxy configuration update.

Operation Pipeline

The operation pipeline is a meta-data driven workflow. It is responsible for managing the mapping of the routing information and execution of the transformation policies for both the request and response. The pipeline has four main steps: Frontend, Inbound, Backend and Outbound.

The Frontend steps handles the Open API specifications JSON document. It defines the hostname, HTTP schemes, and security requirements for the API. It also defines, for each operation, the API route, HTTP method, request parameters or model schema for both the request and response. The models are the JSON contracts that the client application sends and receives.

The Inbound step runs the transformation policies. This includes adding header information, rewrites the URL to change the operation route into the route for the external API. It also handles the transformation of the operation request model into the JSON or XML document for the external API. As an example, this is the step that transform a JSON payload into SOAP by adding the SOAPAction header and SOAP envelope into the request.

The Backend step defines the base URL for the target HTTP endpoint. Each operation route is appended to the backend base URL to send the request to the provider. On this step, security credentials or certificated can be added.

Lastly, the Outbound step, like the Inbound step, handles header and document transformation before the response is sent back to the client application. It transforms the JSON or XML payload into the JSON model defined by the Frontend schema configuration. This also the place to add error handling document standards for the application to handle and log accordingly independently of the provider.

This is an example of a transformation policy which shows an inbound request transformed to SOAP and outbound response transformed to JSON.

Conclusion

In Microservice architecture, a client application can be introduced to disparate APIs which support multiple document structure and different endpoints, as these API services are hosted in different domains. To avoid complex code which deal with multiple document formats and endpoints, an API Gateway can be used instead. This enables us to use meta-data driven pipelines to manage that complexity away from the app. This should enable the development teams to focus on app design and functional programming instead of writing code to manage infrastructure concerns.

Have you faced this challenge before, and if so, what did you do to resolve it? If you use code in your app, what did you learn from that experience?

Send question or comment at Twitter @ozkary

Originally published by ozkary.com