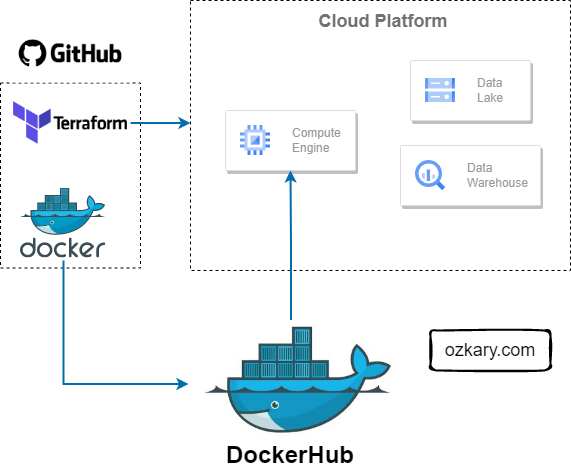
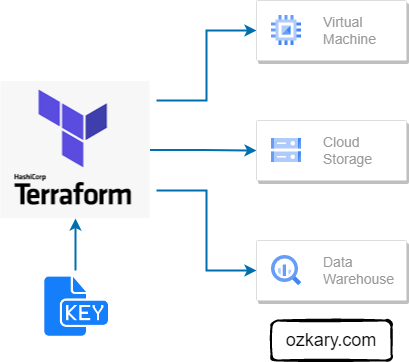
Having laid a strong design foundation, it's time to embark on a hands-on exercise that's crucial to our data engineering project's success. Our immediate focus is on building the essential cloud resources that will serve as the backbone for our data pipelines, data lake, and data warehouse. Taking a cloud-agnostic approach ensures our implementation remains flexible and adaptable across different cloud providers, enabling us to leverage the advantages of multiple platforms or switch providers seamlessly if required. By completing this step, we set the stage for efficient and effective coding of our solutions. Let's get started on this vital infrastructure-building journey.

Cloud Infrastructure Planning
Infrastructure planning is a critical aspect of every technical project, laying the foundation for successful project delivery. In the case of a Data Engineering project, it becomes even more crucial. To support our project's objectives, we need to carefully consider and provision specific resources:
- VM instance: This serves as the backbone for hosting our data pipelines and orchestration, ensuring efficient execution of our data workflows.
- Data Lake: A vital component for storing various data formats, such as CSV or Parquet files, in a scalable and flexible manner.
- Data Warehouse: An essential resource that hosts transformed and curated data, providing a high-performance environment for easy access by visualization tools.
Infrastructure automation, facilitated by tools like Terraform, is important in modern data engineering projects. It enables the provisioning and management of cloud resources, such as virtual machines and storage, in a consistent and reproducible manner. Infrastructure as Code (IaC) allows teams to define their infrastructure declaratively, track it in source control, version it, and apply changes as needed. Automation reduces manual efforts, ensures consistency, and enables infrastructure to be treated as a code artifact, improving reliability and scalability.

Infrastructure Implementation Requirements
When using Terraform with a any cloud provider, there are several key artifacts and considerations to keep in mind for successful configuration and security. Terraform needs access to the cloud account where it can provision the resources. The account token or credentials can vary based on your cloud configuration. For our purpose, we will use a GCP (Google) project to build our resources, but first we need to install the Terraform dependencies for the development environment.
Install Terraform
To install Terraform, open a bash terminal and run the commands below:
- Download the package file
- Unzip the file
- Copy the Terraform binary from the extracted file to the /usr/bin/ directory
- Verify the version
$ wget https://releases.hashicorp.com/terraform/1.3.7/terraform_1.3.7_linux_amd64.zip
$ unzip terraform_1.1.2_linux_amd64.zip
$ cp terraform /usr/bin/
$ terraform -v
We should get an output similar to this:
Terraform v1.3.7
on linux_amd64
Configure a Cloud Account
Create a Google account. Here
- Create a new project
- Make sure to keep track of the Project ID and the location for your project
Create a service account
- In the left-hand menu, click on "IAM & Admin" and then select "Service accounts"
- Click on the "Create Service Account" button at the top of the page
- Enter a name for the service account and an optional description
- Then add the BigQuery Admin, Storage Admin, Storage Object Admin as roles for our service account and click the save button.

- Enable IAM APIs by clicking the following links:
Authenticate the VM or Local environment with GCP
- In the left navigation menu (GCP), click on "IAM & Admin" and then "Service accounts"
- Click on the three verticals dots under the action section for the service name you just created
- Then click Manage keys, Add key, Create new key. Select JSON option and click Create
- Move the key file to a system folder
$ mkdir -p $HOME/.gcp/
$ mv ~/Downloads/{xxxxxx}.json ~/.gcp/{acc_credentials}.json
- install the SDK and CLI Tools
- Validate the installation and login to GCP with the following commands
$ echo 'export GOOGLE_APPLICATION_CREDENTIALS="~/.gcp/{acc_credentials}.json"' >> ~/.bashrc $ export GOOGLE_APPLICATION_CREDENTIALS="~/.gcp/{acc_credentials}.json" $ gcloud auth application-default login - Follow the login process on the browser
Review the Code
👉 Clone this repo or copy the files from this folder
Terraform uses declarative configuration files written in a domain-specific language (DSL) called HCL (HashiCorp Configuration Language). It provides a concise and human-readable syntax for defining resources, dependencies, and configurations, enabling us to provision, modify, and destroy infrastructure in a predictable and reproducible manner.
At a minimum, we should define a variables file, which contains the cloud provider information and a resource file which define what kind of resources should be provision on the cloud. There could be a file for each resource or a single file can define multiple resources.
Variables File
The variables file is used to define a set of variables that can be used on the resource file. This allows for the use of those variables in one more more resource configuration files. The format looks as follows:
locals {
  data_lake_bucket = "mta_data_lake"
}

variable "project" {
  description = "Enter Your GCP Project ID"
  type = string
}

variable "region" {
  description = "Region for GCP resources. Choose as per your location: https://cloud.google.com/about/locations"
  default = "us-east1"
  type = string
}

variable "storage_class" {
  description = "Storage class type for your bucket. Check official docs for more info."
  default = "STANDARD"
  type = string
}

variable "stg_dataset" {
  description = "BigQuery Dataset that raw data (from GCS) will be written to"
  type = string
  default = "mta_data"
}

variable "vm_image" {
  description = "Base image for your Virtual Machine."
  type = string
  default = "ubuntu-os-cloud/ubuntu-2004-lts"
}
Resource File
The resource file is where we define what should be provisioned on the cloud. This is also the file where we need to define the provider specific resources that need to be created.
terraform {
  required_version = ">= 1.0"
  backend "local" {}  # Can change from "local" to "gcs" (for google) or "s3" (for aws), if you would like to preserve your tf-state online
  required_providers {
    google = {
      source  = "hashicorp/google"
    }
  }
}

provider "google" {
  project = var.project
  region = var.region
  // credentials = file(var.credentials)  # Use this if you do not want to set env-var GOOGLE_APPLICATION_CREDENTIALS
}

# Data Lake Bucket
# Ref: https://registry.terraform.io/providers/hashicorp/google/latest/docs/resources/storage_bucket
resource "google_storage_bucket" "data-lake-bucket" {
  name          = "${local.data_lake_bucket}_${var.project}" # Concatenating DL bucket & Project name for unique naming
  location      = var.region

  # Optional, but recommended settings:
  storage_class = var.storage_class
  uniform_bucket_level_access = true

  versioning {
    enabled     = true
  }

  lifecycle_rule {
    action {
      type = "Delete"
    }
    condition {
      age = 15  // days
    }
  }

  force_destroy = true
}

# BigQuery data warehouse
# Ref: https://registry.terraform.io/providers/hashicorp/google/latest/docs/resources/bigquery_dataset
resource "google_bigquery_dataset" "stg_dataset" {
  dataset_id = var.stg_dataset
  project    = var.project
  location   = var.region
}

# VM instance
resource "google_compute_instance" "vm_instance" {
  name          = "mta-instance"
  project       = var.project
  machine_type  = "e2-standard-4"
  zone          = var.region

  boot_disk {
    initialize_params {
      image = var.vm_image
    }
  }

  network_interface {
    network = "default"

    access_config {
      // Ephemeral public IP
    }
  }
}
This Terraform file defines the infrastructure components to be provisioned on the Google Cloud Platform (GCP). It includes the configuration for the Terraform backend, required providers, and the resources to be created.
- The backend section specifies the backend type as "local" for storing the Terraform state locally. It can be changed to "gcs" or "s3" for cloud storage if desired.
- The required_providers block defines the required provider and its source, in this case, the Google Cloud provider.
- The provider block configures the Google provider with the project and region specified as variables. It can use either environment variable GOOGLE_APPLICATION_CREDENTIALS or the credentials file defined in the variables.
- The resource blocks define the infrastructure resources to be created, such as a Google Storage Bucket for the data lake, Google BigQuery datasets for staging and production, and a Google Compute Engine instance named "mta-instance" with specific configuration settings.
Overall, this Terraform file automates the provisioning of a data lake bucket, BigQuery datasets, and a virtual machine instance on the Google Cloud Platform.
How to run it!
- Refresh service-account's auth-token for this session
$ gcloud auth application-default login
- Set the credentials file on the bash configuration file
- Add the export line and replace filename-here with your file
$ echo export GOOGLE_APPLICATION_CREDENTIALS="${HOME}/.gcp/filename-here.json" >> ~/.bashrc && source ~/.bashrc
Open the terraform folder in your project
Initialize state file (.tfstate) by running terraform init
$ cd ./terraform
$ terraform init
- Check changes to new infrastructure plan before applying them
It is important to always review the plan to make sure no unwanted changes are showing up.
👉 Get the project id from your GCP cloud console and replace it on the next command
$ terraform plan -var="project=<your-gcp-project-id>"
- Apply the changes
This provisions the resources on the cloud project.
$ terraform apply -var="project=<your-gcp-project-id>"
- (Optional) Delete infrastructure after your work, to avoid costs on any running services
$ terraform destroy
Terraform Lifecycle

GitHub Action
In order to be able to automate the building of infrastructure with GitHub, we need to define the cloud provider token as a secret with GitHub. This can be done by following the steps from this link:
Once the secret has been configured, we can create a build action script with the cloud provider secret information as shown with this GitHub Action workflow YAML file:
name: Terraform Deployment

on:
  push:
    branches:
      - main

jobs:
  deploy:
    runs-on: ubuntu-latest

    steps:
    - name: Checkout repository
      uses: actions/checkout@v2

    - name: Set up Terraform
      uses: hashicorp/setup-terraform@v1

    - name: Terraform Init
       env:
        GOOGLE_APPLICATION_CREDENTIALS:  ${{ secrets.GOOGLE_APPLICATION_CREDENTIALS }}
      run: |
        cd Step2-Cloud-Infrastructure/terraform
        terraform init

    - name: Terraform Apply
      run: |
        cd path/to/terraform/project
        terraform apply -auto-approve
Conclusion
With this exercise, we gain practical experience in using tools like Terraform to automate the provisioning of resources, such as VM, a data lakes and other components essential to our data engineering system. By following cloud-agnostic practices, we can achieve interoperability and avoid vendor lock-in, ensuring our project remains scalable, cost-effective, and adaptable to future requirements.
Next Step
After building our cloud infrastructure, we are now ready to talk about the implementation and orchestration of a data pipeline and review some of the operational requirements that can enable us to make decisions.
Coming Soon!
👉 [Data Engineering Process Fundamentals - Data Pipeline and Orchestration]
Thanks for reading.
Send question or comment at Twitter @ozkary
👍 Originally published by ozkary.com


0 comments :
Post a Comment
What do you think?